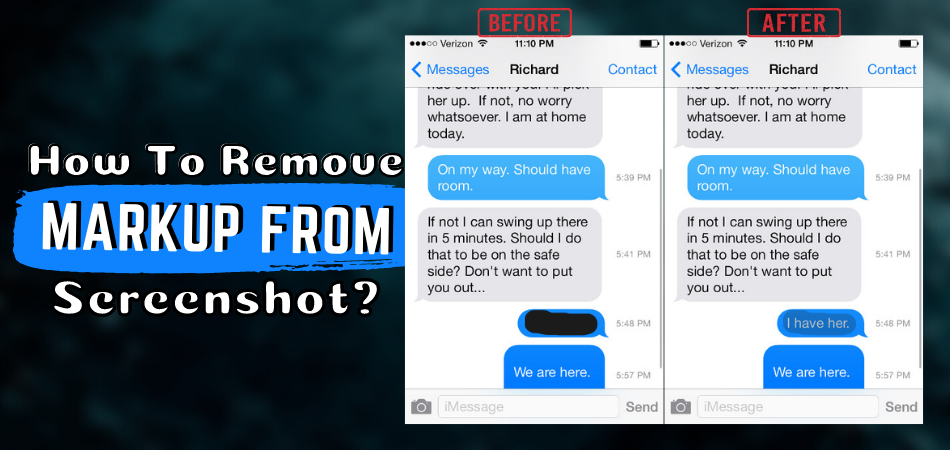
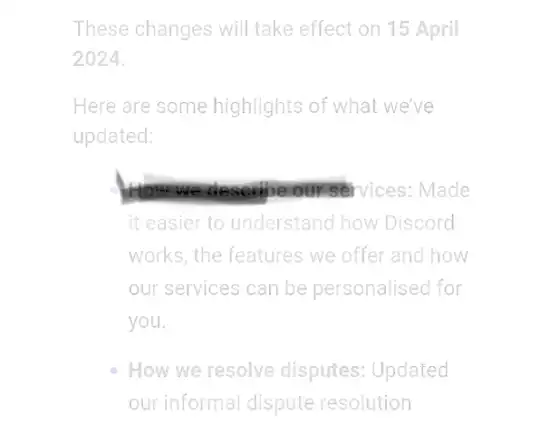
Have you ever received a screenshot from someone, only to find parts of it obscured by markup? Whether it’s confidential information blacked out or annotations covering up important details, that markup can be frustrating when you need to see what’s underneath. You might find yourself wishing there was a way to simply remove those markup layers and reveal the original content.
Well, your wish is about to come true. In this guide, I’ll guide you through the process of removing markup from screenshots, so you can uncover what’s been hidden away. Well, it’s not possible to erase the markup completely, however, by doing some edits, you can read the hidden things in the picture! So, what are we waiting for? Let’s begin!
Methods for Removing Markup from Screenshot
Removing the markup from the screenshot taken on your iPhone or Android is possible with some online tools or apps. Using these tools or apps can uncover the blacked-out text for free.
All you need to do is to follow some simple steps. Some of the prominent methods to remove markup from screenshots are listed below:
Method 1: Use the Default Photos App
The blacked-out part on the screenshot can be visible through the photos app on your Android or iPhone. To do so, you have to follow some steps in sequences. Here are the steps to follow:
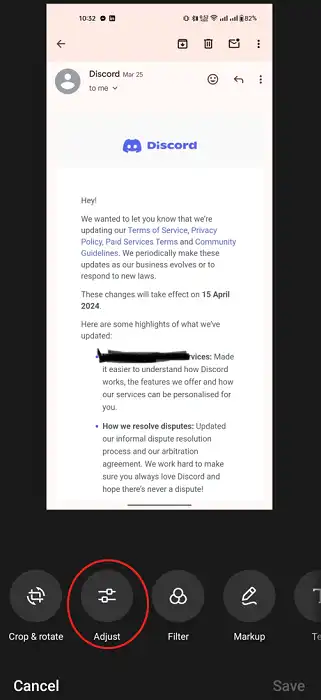
Step 1: Open Photos or Gallery
The first step would be to open photos or gallery on your smartphone and then choose the screenshot that you want to free from markups.
Step 2: Go to The Edit Option
Now, you need to tap on the edit option on the interface. After tapping on that, you will see a lot of editing tools, from there, tap on Adjust.
From there, do the following changes drag the image’s brightness, shadows, and brilliance to 100%.
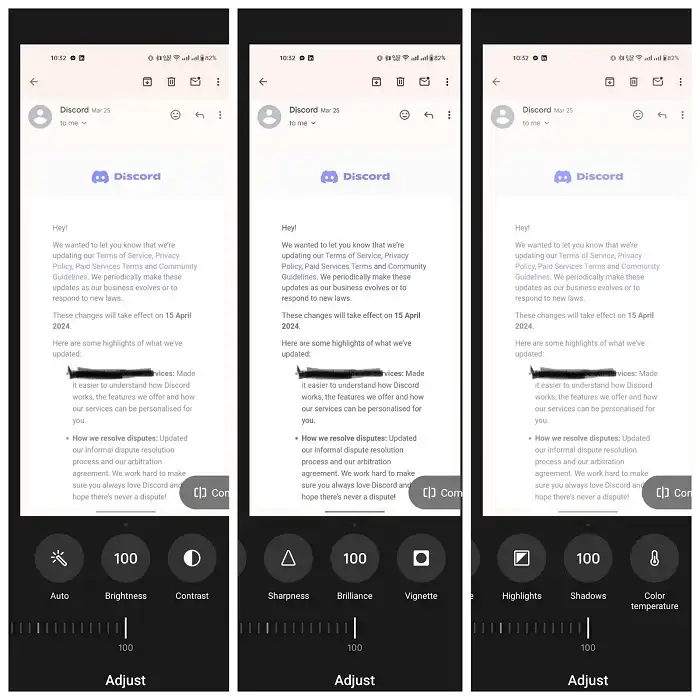
If still you are struggling to remove the markup or read what’s written underneath it, then make the following adjustments as well!
Exposure: 100%
Highlights: 100%
Contrast: –100%
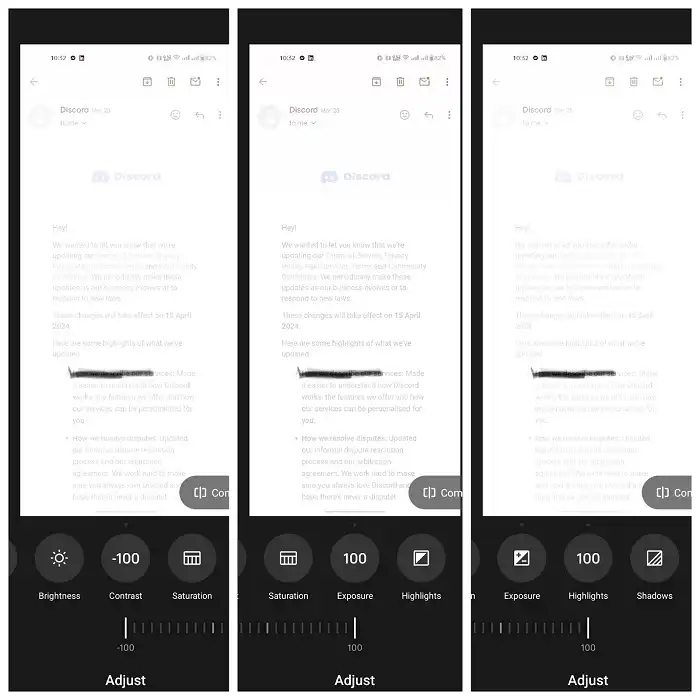
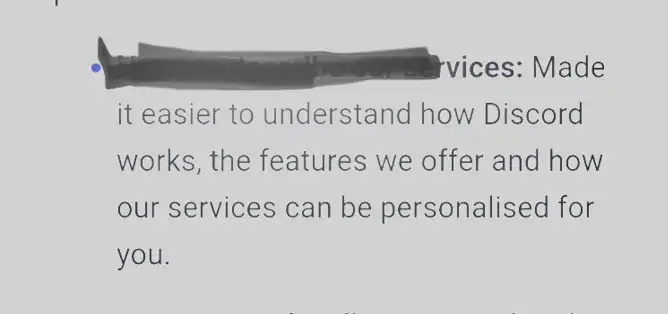
After this, you will be able to read what’s written underneath the markup easily!
Method 2: Use Snapseed
Snapseed is a photo editing app that will help you view hidden text under the highlighter. This app is mainly used on Android smartphones. And that is why it is an excellent option to remove markup from a screenshot on Android. The steps for the removal of markup are mentioned below:
Step 1: Go to The Snapseed App
On your menu, look for the Snapseed app and then open it.
Step 2: Open Screenshot
After you open the app, you’ll see the interface asking you to select the desired photo. You need to tap on the screen and choose the desired marked screenshot.
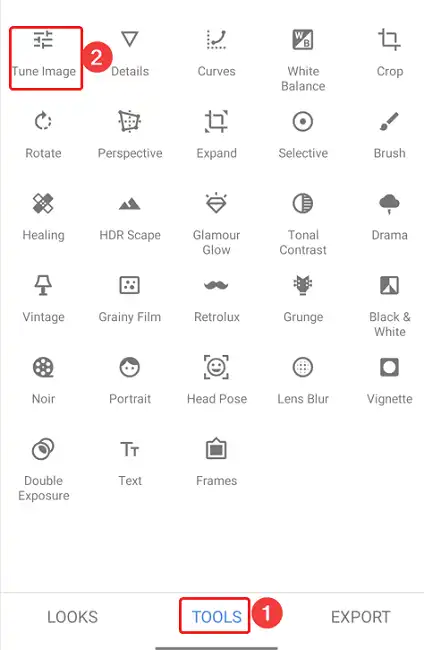
Step 3: Click on Tools
After you select the image, click on the tools option. From there, select the Tune Image option at the top-left.
Step 4: Drag the Parameters
In this step, you need to drag different parameters. Starting with the brightness, pull it to 100 plus. Then, drag the contrast to minus 100. After that, drag the highlights and ambiance to 100 plus.
Lastly, when you set the shadows to 100 plus, actually it will depend on you. Sometimes, increasing the shadow value to 50 gets the work down, and sometimes it fails! So, keep increasing until you become able to read what’s written underneath!
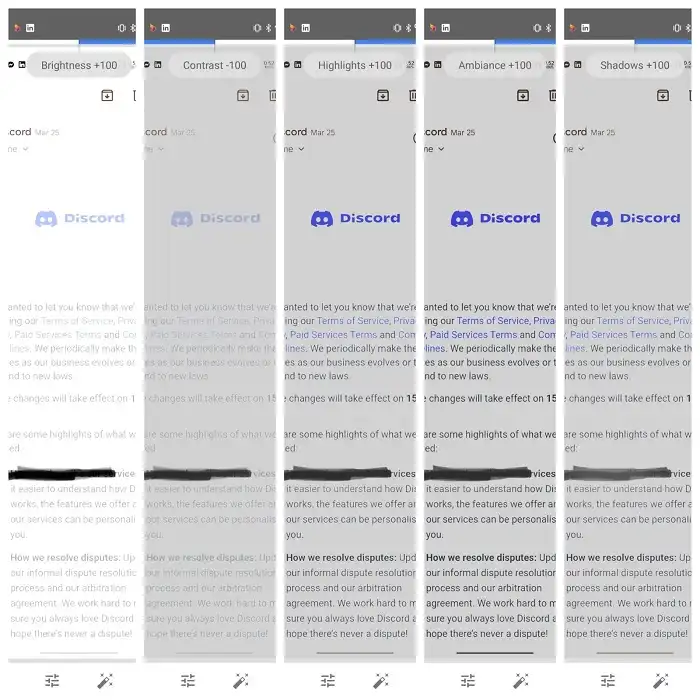
Now, you can view the hidden part in the screenshot.
Is Removing Markup from Screenshots Worth It?
There can be situations when you have forgotten or are in dire need of the information that you hide. In that situation, the best option is to select an editor that helps you remove the markup from the screenshot.
Removing the markup from photos becomes easygoing when colors like black or white are used. These colors come up with opacity issues that aren’t visible to the naked eye. That is why you can easily extract the sensitive pieces of information you once hid.
Revealing the concealed information under the markup would take two to six adjustments. Therefore, it’s not a gruesome task or a long process, to begin with.
Some Tips on Removing Markup from The Screenshot
The markup removal from the screenshot will take time when you don’t use the right tool. Various tools claim to be efficient in uncovering the black-marked text. But in reality, only a few are successful in doing so.
Mostly, the markup given using black or white color is easily removable. The reason is that when you lower the opacity, these colors are readily transparent. But this task would be relatively tough with other solid colors like red, green, or blue.
Therefore, it would be recommended to use paid and advanced tools for the removal of markup on photos with different colors.
Conclusion
The issue with markup screenshots is that many don’t know about uncovering the blacked-out part. Several apps or websites claim a solution, but only a few have it.
The first prerequisite of seeing through a highlighted part on a screenshot is that the color must be black or white. Or else it would be near impossible to make the concealed text or information visible with a free tool. In addition, the number of layers on the markup also matters as it gets more challenging when multiple layers are there.
To end up, using the two methods mentioned above, markups can be removed when prerequisites are met. However, if the situation is the opposite, it is better to try advanced tools.