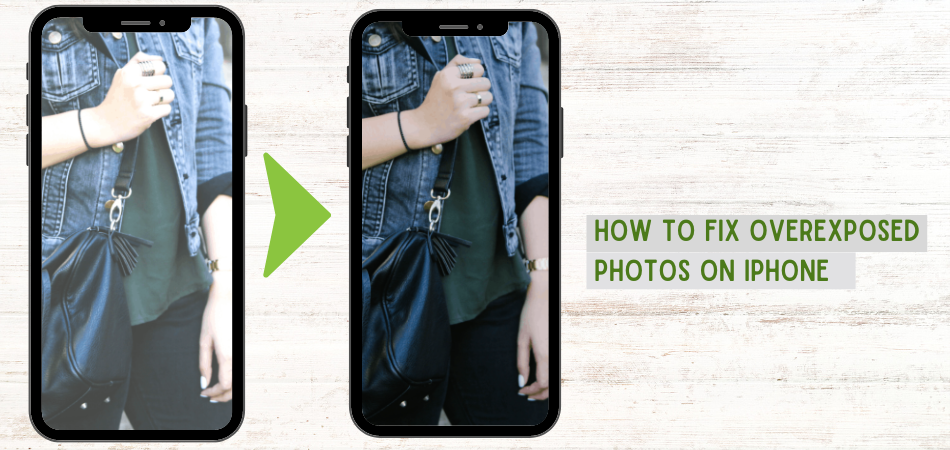
One of the biggest flaws of a quality picture on an iPhone is the overexposure caused by the device or the natural scenario of the subject. After capturing a good picture, you may wonder how to fix overexposed photos on an iPhone.
For beginners, you can easily tune the overexposure issue using the default photo editor of iOS. The “Exposure” option in the camera app lets you regulate the exposure for over/underexposure. Besides, there are free photo editing apps like Lightroom and Snapseed to get the job done.
Go through this article, as it will walk you through all the effective measures to control and fix the overexposed photos clicked on your iPhone.
What Happens If A Picture Is Overexposed?
A professional photographer must have a clear concept and understanding of exposure, overexposure, and underexposure. Hence, firstly you should know the meaning of overexposure.
A key element in the improvement and quality of an image is its brightness. An image is overexposed when the subject’s brightness is more than is reasonable and thus results in losing the major and minor details.
Results of Overexposed Pictures
When a picture taken by an iPhone is overexposed, it looks more unrealistic than the original visual by the human eye. The picture’s overall brightness becomes much higher than the normal or average range. Therefore this effect causes the picture to look like a light burnt one.
As a result, the small details in the picture get hidden by the extra brightness, which ultimately degrades the picture quality. If the picture is a portrait, the subject’s facial expression becomes overly bright compared to the background.
Moreover, for a landscape picture of a scenario in the distance, overexposure causes losing the color gradients, differentiating the edges of the objects in the picture.
What Causes Overexposure In Photos?
There are several causes for overexposing photos clicked on iPhones. Although the default camera app automatically resolves the exposure using the AI algorithm. But sometimes, the manual settings by the user result in overexposing the picture.
Long Exposure
When a picture is clicked, a sufficient amount of light from the subject is reflected to the digital camera’s sensor. If the amount of light is way much higher than the natural value, the picture is overexposed. It is because more light from the subject means more brightness the sensor captures.
The exposure on iPhone is automatically controlled by the camera app and is composed of three major settings. These are the shutter speed, ISO, and Exposure Value (EV). Sometimes the white balance plays important in regulating picture exposure.
Shutter Speed
When the shutter speed is lower, it takes more time to close the camera shutter. As a result, a lot of light enters the sensor burning up the photo, otherwise known as overexposing the photo.
The shutter speed is used to control the entrance time of light, which is reflected from the subject. It is used for long-exposure photos in low light. Using slow shutter speed in a very bright environment causes overexposure.
ISO Settings
A camera’s ISO setting only determines how bright or dark a picture will be. Your pictures will become brighter as you raise your ISO setting. Because of this, ISO enables you to take pictures in low-light conditions or adjust your apertures and shutter speed more freely.
To be more precise, ISO is the lens/sensor sensitivity towards light. The regular ISO values start from 100 and can be up to as high as 6400. A higher ISO makes the sensor less sensitive to light and raises the overall brightness (subject and background), resulting in an overexposed picture.
How To Fix Overexposed Photos On iPhone?
If you have taken a slightly overexposed picture, you can manually fix it using various applications. Follow the below-mentioned steps to fix the overexposed photos to an aesthetic one.
Method 1: Edit Brightness In The Photos App
The iPhones come with a default yet effective camera application that can be used for post-production and editing.
Step 1: Decreasing Exposure
Firstly, open the camera roll and select the picture you want to fix. Tap on the “Edit” button located in the top right corner.
A new interface will open with lots of setting options for photo editing. Adjacent to the “Auto adjustment” mode, you will get the “Exposure” regulator. You will get a dial for increasing and decreasing the exposure by sliding it to the left and right.
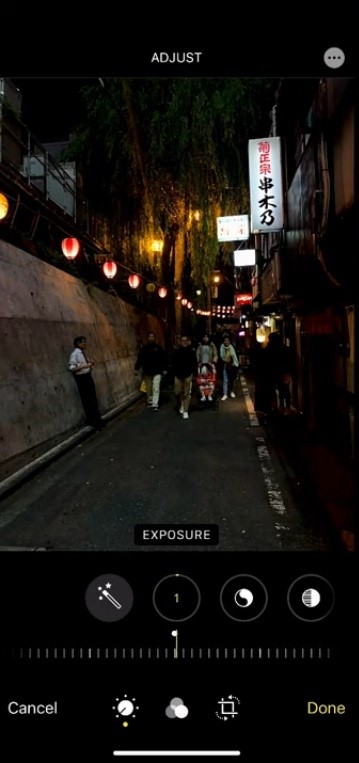
To lower the increased exposure, slide the dial towards the left. Choose the best value for getting an enhanced picture. Tap and hold on to the picture to compare the edited picture with the original one.
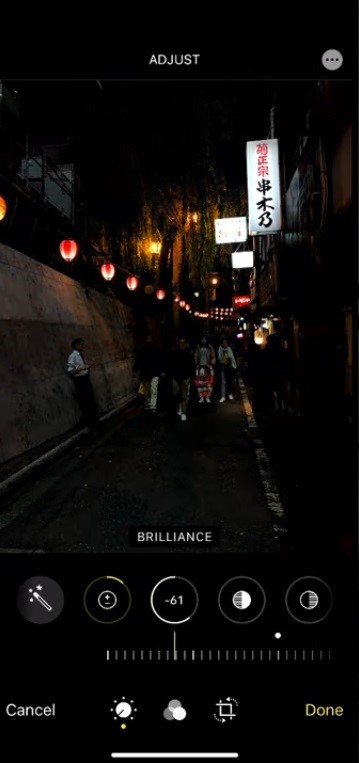
Step 2: Brilliance Correction
Adjacent to the Exposure, you will get the “Brilliance” mode which is also used to fine-tune the amount of light to be exposed in your picture. Simply decrease the value slowly and choose the preferred value for correcting your overexposed picture.
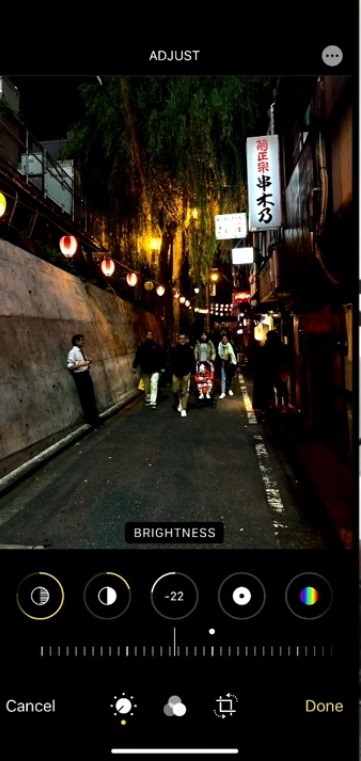
Step 3: Brightness Correction
Lastly, select the Brightness adjuster to decrease the value to a certain point when the picture’s exposure is corrected and looks good compared to the original. Check that the details are tuned while decreasing the brightness at value and lock that value.
Method 2: Use Snapseed
Snapseed is a free photo editing app from Google. Open the overexposed photo from the camera roll in Snapseed.
Step 1: Manually Tuning Image
Firstly, slide up the toolbar. Start fine-tuning the picture by decreasing the brightness and highlights. After that, increase the shadow slightly depending upon the amount of lights and dark shadows in your image.
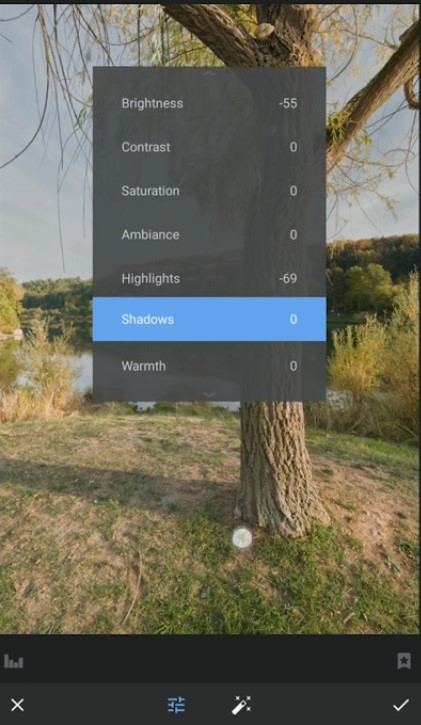
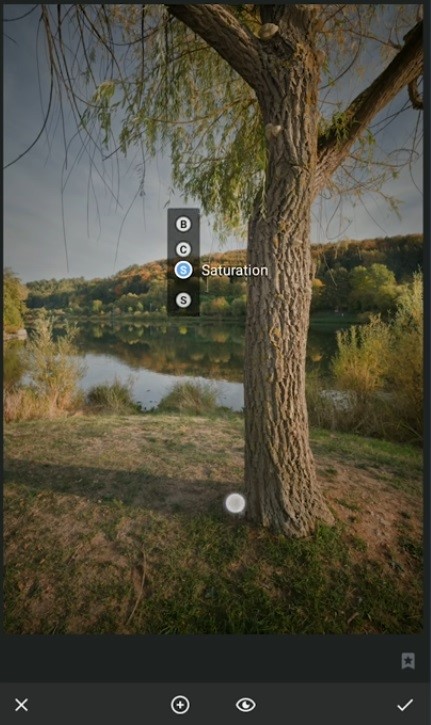
Step 2: Using The Selective Tool
You can manually change the exposure and brightness of a certain part of the image which seems to be overexposed, leaving the other parts intact. Select the portion of the image and tap on it to get the options. Use the slider to tune the brightness and exposure for better results.
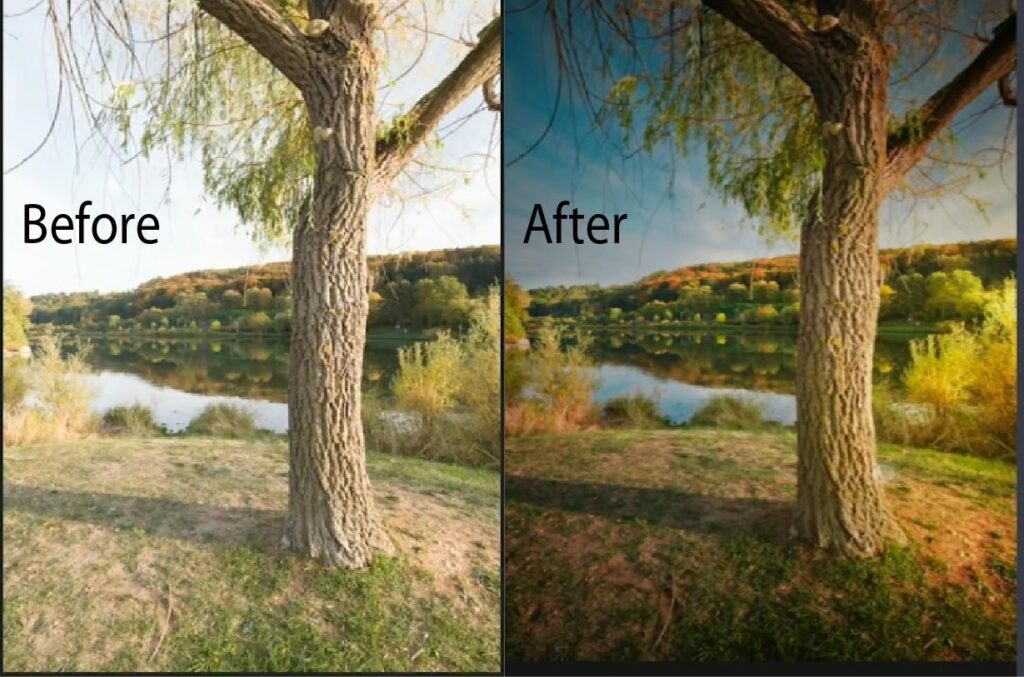
The comparative results would be as like the picture below.
Method 3: Use Adobe Lightroom
Adobe Lightroom is one of the most effective photo editing apps available for iOS platforms. Moreover, it is free to use.
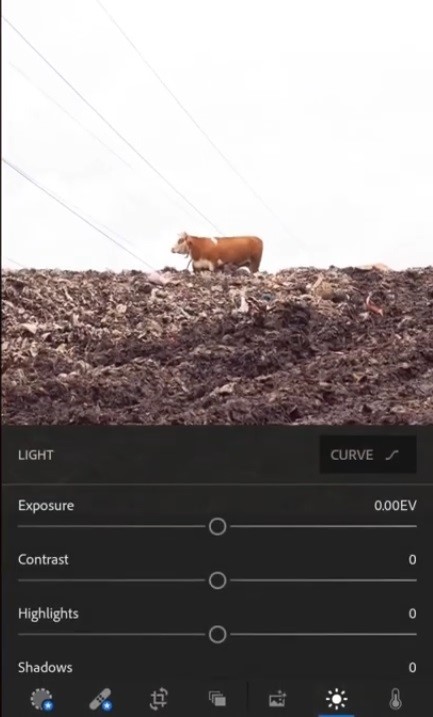
Step 1: Adjustment In Light Settings
From the “Light Setting,” you need to decrease the exposure and highlights. After that, increase the shadow slightly. You can also use the “S-Curve” option for better tuning the exposure of the picture.
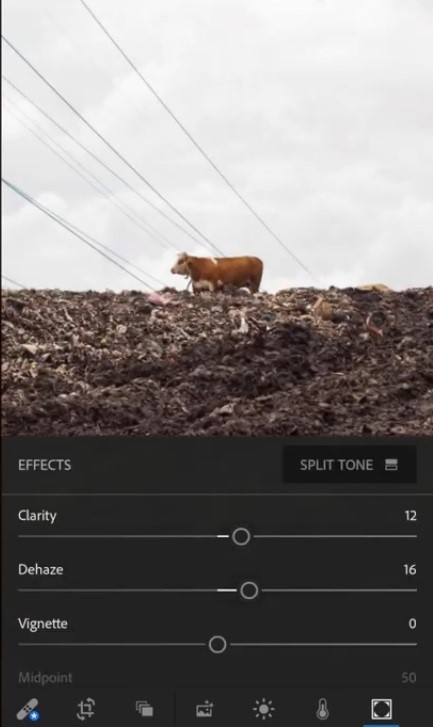
Step 2: Using Different Effects
The default effects provided with the app also help to fix the exposure to an extent. Open the “Effects” setting and increase the “Clarity” and “Dehaze” by sliding the bar to enhance the color popping of the image, which was covered by the overexposure.
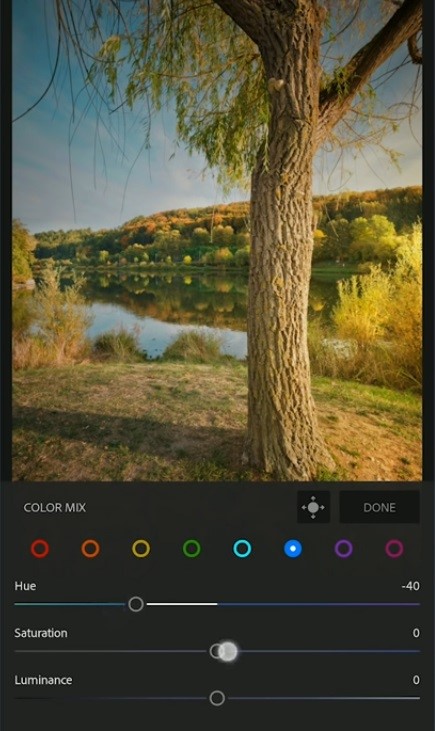
Step 3: Using Color Mix Settings
Start with opening the picture and choosing the photo for editing. Increase the vibrance of the photo by changing the Hue, Saturation, and Luminescence. Fine-tune the colors manually to make the image more vibrant.
Method 3: Using Adobe Photoshop On iPhone
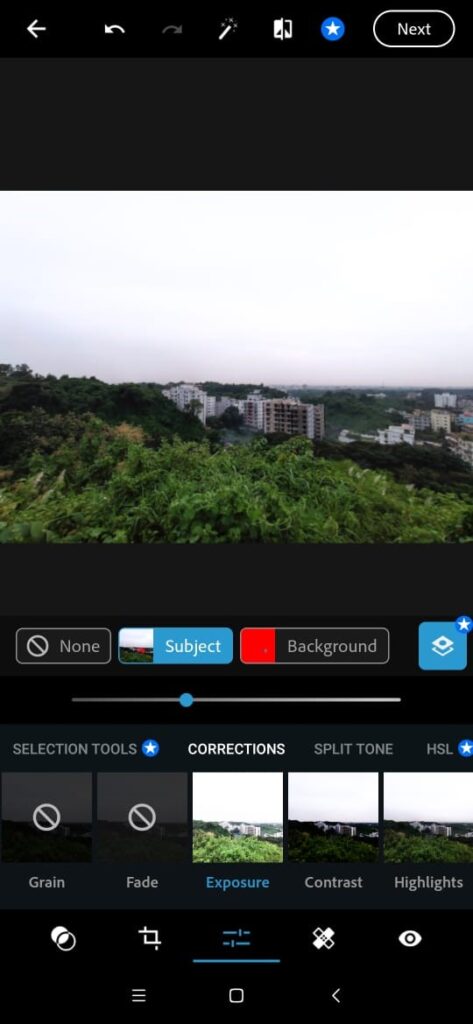
Adobe Photoshop for the iOs comes with a basic interface compared to Windows or Mac. To fix the overexposure in Photoshop, open the application and log into your account using the Adobe id. After that, select the photo you want to fix.
Tap on the “Tune Button” located in the middle of the bottom tab of the interface. After that, open the “correction” tab. Now, select Subject or Background. This allows you to correct the exposure of the subject and background manually.
Decrease the exposure, and increase the highlights according to your preference. You can also decrease the contrast if needed.
Some Tips To Follow When Fixing Overexposed Photos
Keep the following points in mind while correcting the overexposure for better results.
- Give attention to the details of the picture.
- Use the S-curve for fine-tuning.
- Fix the exposure of the subject and background individually.
- Use selective tools for more intense tuning of specific overexposed parts of the picture.
- Always compare the edited picture with the original one to check if more corrections are needed.
FAQ’s
These are common questionnaires about exposure corrections presented by regular users and photographers. It can be useful for new users wondering how to deal with exposure issues.
How do you tell if a photo is properly exposed?
You can check the brightness and details of the subject to know if the picture is properly exposed. If the details in the picture are not visible due to excessive light interference, then the picture is overexposed.
Why are my iPhone photos overexposed?
Iphones do not have the professional mode in the default camera app. As a result, users cannot control the shutter speed, ISO, and Exposure Value while taking a picture. The camera app uses the default algorithm to detect a scene and control its exposure which is not up to the mark.
Is it better to shoot overexposed or underexposed?
A picture should be properly exposed for more vibrant colors and details. Over or underexposed pictures lack showing the original colors of the subject and background, degrading the overall quality of the picture. Overexposed pictures are suitable for low light conditions and vice versa.
How to click a correctly exposed picture on iPhone?
Aim the camera at the subject and tap on the screen to lock on the focus. Slide the little sun icon to select the suitable exposure for the picture. You can also tap and hold for two seconds to lock the target subject and change the brightness as needed.
Conclusion
Mobile photography is getting trendy nowadays. The iPhone is currently the best device for mobile photography due to its advanced sensor. But poor app update and lack of control over the sensor results in overexposed pictures in bright light conditions.
Hence, you need to know how to fix overexposed photos on your iPhone for post-production. The default photo editor, Lightroom, Snapseed, and Photoshop are some genuine tools for exposure correction.
We hope the above guidelines in this article have been instructive and give you a better result in fixing the overexposed photos on your iPhone.