If you are working on posters, you can agree that shadows add vibrancy and depth to images and texts. But then not many graphic designers know how to add a drop shadow to text in Photoshop.
We present a guide to making it easy for you to add a drop shadow to a text. You might find this also useful if you want to do the same for images.
How to Add A Drop Shadow To Text in Photoshop
To add a drop shadow to text in Photoshop you would have to use the Layer Style option on your window to add the preferred layer. While selecting the drop shadow is not that difficult there are several ways to access this. Once that is done, getting it to appear nice would require a little touch-up. Let’s begin!
Highlight the Text
Before you begin to create a drop shadow, the first thing is to select or highlight the text you want to apply this effect too. Simply click on the text to highlight it and Photoshop will then know the exact place you want the drop shadow to be applied.
Adding the “Drop Shadow”
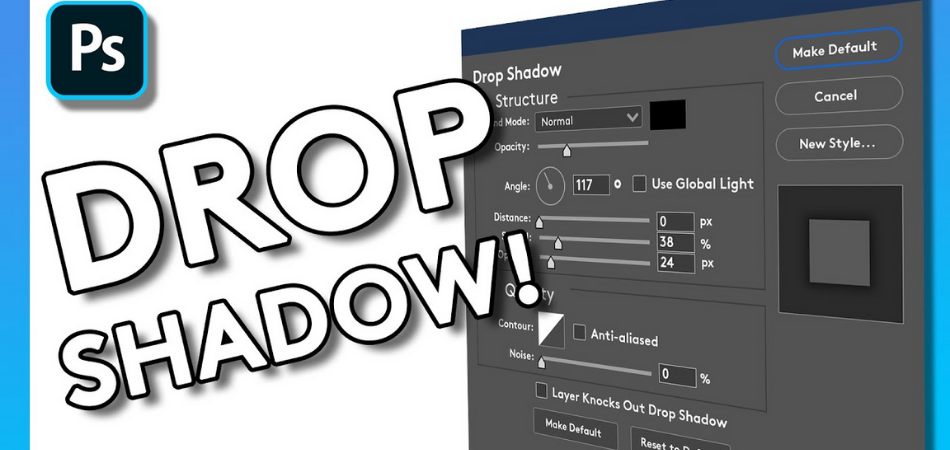
With the text highlighted, there are three ways to get to the “Drop Shadow” option. First, on the LAYERS panel, you could double-click the text layers. This would bring a LAYER STYLE window from where you could select DROP SHADOW and follow through with the adjustment settings.
Another option is by clicking on the FX icon found at the bottom of your layers panel. When you click on the FX icon, you will immediately see the same creative LAYER STYLE window as was brought in the previous method. Since you intend to create a drop shadow, you can click on DROP SHADOW which can be found from the list of options.
The third way of getting to drop shadow is by selecting the LAYER directly from the overhead menu. This would present you with a drop-down list from which you select LAYER STYLE> DROP SHADOW. From here, the same window pops up and you continue your work.
Although, the drop shadow will be applied to the text layer you selected beware that you might still need to make some adjustments and additional settings to get it just right.
Drop shadow positioning
After selecting and applying the shadow effect, you would still have other adjustments to make. One of such is to adjust the position or the side to which the shadow should fall using the angle adjustment tool. If you want the shadow to be cast only on a side or you want to reduce the intensity, you would find this tool useful. More than just for text, it also works for image shadow masking if you want to remove the shadow from images.
This you can do in two ways. One, you could choose to simply click anywhere within the light source adjustment. Doing this changes the direction of the light, hence positioning the drop shadow on the opposite side of the source.
The second choice you have is to simply type in the typical angle you want the shadow to be at in the options box that would be displayed. Thus, if you input an angle of 45°, the light angle would adjust accordingly.
Refine the look of The Shadow
With the drop shadow right where you want it, you can make arrangements for the look of your drop shadow. To do this, you would need the three sliders; distance, spread, and size that are just beneath the angle adjustment.
Distance: this slider is used for controlling the distance between your shadow and your text. Note that the farther your distance, the more obvious the shadow stands out. If it gets too much, however, it might seem too disconnected the drop shadow and layer will become.
Spread controls how wide your drop shadow is in comparison to your layer. If you increase the spread, the shadow on each letter would appear thicker and the reverse for a much less spread.
Size: the size slider works to adjust how the edges appear. With a much larger size, you would see that the edges become softer.
Be aware that there is no right or wrong way of adjusting these sliders, so feel free to experiment with each one, do it until you are satisfied with how your drop shadow looks.
Save the changes
Once you feel happy with the appearance of your drop shadow, it is now the time to commit your changes. Just click OK in the layer styles dialogue box to close the settings and then head back to the layers panel.
If you want to make corrections, you can easily go back to the layer style window through the FX icon that would be beside your layer. By simply double-clicking it, the layer style window would be opened and you don’t have to go the long way
Changing the aesthetics of the drop shadow
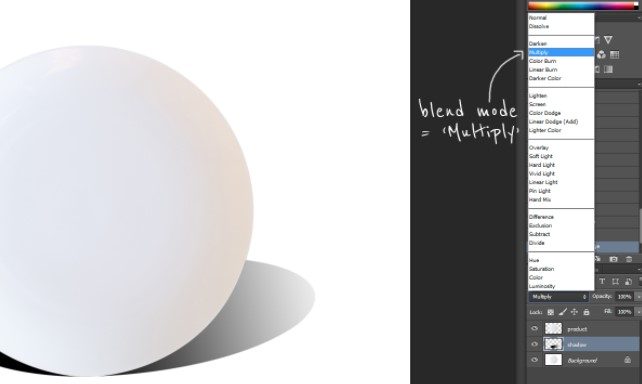
For a more aesthetic design, try adding color to the drop shadow. At the top of the drop shadow settings, there is a colored box close to the blend mode option. When you click on the colored box a color palette opens from which you can choose a new color for your drop shadow.
You can enhance the appearance of the color with a blending tool and adjust the opacity. Opacity determines how transparent the shadow would be by moving the slider either up or down between 0% and 100%.
You get a very visible drop shadow if you increase the opacity to 100%. Try to lower the opacity if you want to soften the intensity of the drop shadow. You can click OK to close the layer styles dialogue box once you are satisfied with all the adjustments that you have made.
Asides from the color, you might decide to create drop shadows that are longer than the text. This might require a little more technicality.
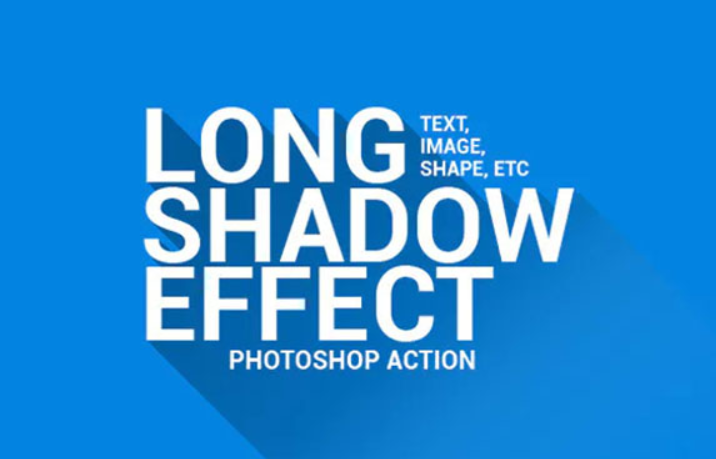
How to Create Long Drop Shadows in Photoshop
This is not like the usual drop shadow, the long drop shadow stretches out from your text much farther while it remains connected. Although following the guide given above, the shadow created might not belong. But to create a long drop shadow in Photoshop, you would have to duplicate the text, give the text your preferred shadow angle and duplicate the angled text 100 times.
- The first step is to duplicate your text layer by pressing Control J on your PC or Mac.
- Next, you change the color of the bottom layer by selecting your most preferred color from the text color palette.
- Adjust the angle of your text. Since you have the underlying layer selected, press Control + T or Command [PC/Mac] to access the transform tool. There will be a rotate setting exactly at 0° by default. You can click on the box to type in the angle you want your long shadow to be at.
- With the perfect angle of the shadow and the text, duplicate the perfect angled layer a hundred times. It might seem like a lot to do but by activating the Move Tool when you press V, this should be done in seconds.
With the Move Tool activated, press down the Alt/Option + the Up Arrow Key to initiate duplication. While you move your layers as they form.
- After you have created at least 100 layers, you need to merge them. Select all the layers you have created and press Command/Control +E
- Make corrections for the angle of the long shadow and the real text. by pressing Control Alt and entering the original rotation angle you used earlier.
- With the right angle, you might need to also reposition the long shadow using your Move Tool so your shadow is in line with the text or where you want it to be. Some people might prefer their long drop shadow to be above or below the text.
- If you are pleased with how your drop shadow looks, it’s fine. But if you want it longer, using Command/Control +J, you can duplicate and move the shadow to the right position.
Bottom line
Working on Photoshop has an amazing feeling attached to it. With all the above guidelines, you are now equipped to easily work on any drop shadow effect. Whether you are interested in standard drop shadows to be added to your text or take matters further with a long drop shadow, it can all be done in just the above little steps.
Drop shadows are a wonderful way to add styles to your graphics but you can also allow them to pop out from the background. Outlining your text is just another good choice for trying to make things stand out.