As a brand owner, do you often find it challenging to choose or change color for your logo? Instead of being stuck with one dull color for your logo or artwork, you can easily change it using different photo editing tools. For instance, you could learn how to change the color of a logo using Photoshop.
Luckily, there are a wide range of color-changing techniques available in Photoshop. You can apply and arrange these techniques with just a few clicks.
The most common way of changing a logo color on Photoshop is applying a Colour Overlay.
Ensure that you save the logo as a PNG file with a transparent background, and then double click on the logo layer to bring up the “Layer Styles” dialogue box. From the Layer Styles menu, select “Colour Overlay” and choose the preferred color you want for the logo. After choosing the color, click “OK” to apply your changes and update the new logo color.
Do you need color correction service within 24 hours? So, Contact Us for trail color correction service.
That’s not all. This guide will examine the different color-changing techniques that are perfect for logos and how you can change the logo color in Photoshop without any hassle. So, let’s get to it.
How to Change the Colour of a Logo in Photoshop?
Have you ever wondered why many brand or shops who sell beauty products often use the color pink for marketing?
Changing the color of a logo is very beneficial to the brand as it helps convey the brand’s value to a particular audience. So, in the case of beauty products, pink goes well with females. But how can you change your brand logo color without any professional help?
Photoshop is a fantastic application that features Color Correction and Color Editing services. Subsequently, it offers color-changing techniques that give excellent results for logos as well.
![]()
But how can you change the color of a logo using Photoshop?
First, the logo needs to be in a PNG and JPG file with a transparent background. This picture format makes it easier for color alterations.
In Photoshop, three primary color-changing techniques work exceptionally well for logos. Without using an illustrator or vector, you can use the following methods to change the color of logos in Photoshop:
- Replace Color feature.
- Color Overlay tool.
- Hue Saturation adjustment.
How to Change the Colour of a Logo in Photoshop Using the Replace Colour Feature?
Notably, the logo needs to be in PNG and JPG format before any color alterations are affected. Using the replace color feature in Photoshop software, you can change the color of your logo.
Below are the needed steps.
Step-1: Choose the Photo
First, open up Photoshop on your device and pick the particular file (logo) you will like to alter.
![]()
Step-2: Select Replace Color Tool
Next, navigate the replace color tool without selecting anything by locating the Image icon, clicking on Adjustment, and then clicking on replace color tool. Replace the color icon that permits you to alter the logo’s color.

Step-3: Image/Object Selection
Next, click on the particular logo area you would like to alter. You will see that part of the logo displayed in black and white in a box.
![]()
Step-4: Select a New Color
Click on the color picker and select your preferred color. Toggle the mouse to play with different shades of the same color and then click ok.
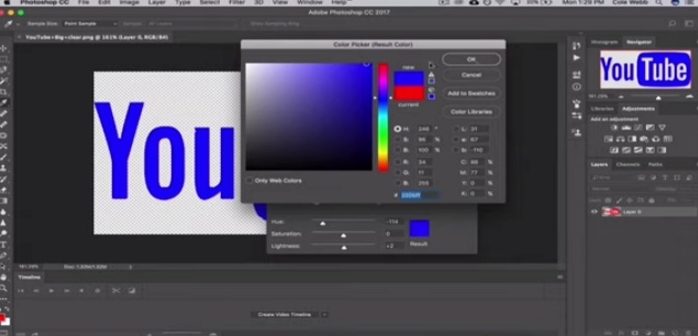
Step-5: Enjoy!
That is it, the final result. The color of the logo has been changed.
![]()
How to Change the Colour of a Logo in Photoshop Using a Colour Overlay?
The color overlay method is another good technique that can change the color of a logo. It works well for symbols that have a transparent background. It is also the best method recommended when you change the logo from one color to a different color entirely.
Below is a step-by-step guide on how to change the color of a logo in Photoshop using a Colour Overlay.
- Step One: First, open the Photoshop software, and then open the logo file. The logo must have a transparent background (there is no white behind the logo’s thumbnail).
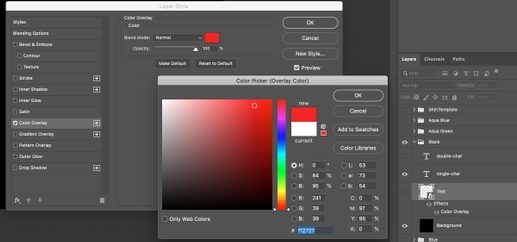
- Step Two: Double click on the logo layer. Then a new icon will appear showing the ‘layer styles‘ dialogue box.
- Step Three: Navigate through the layer styles dialogue box, then select the ‘color overlay‘ tool. A color palette will display.
- Step Four: Next, make sure the opacity is at 100%, and the blend mode must be expected before selecting a particular color.
- Step Five: After choosing a new color, click OK for the color changes applied to the logo.
How to Selectively Apply Colour to the Logo Using Color Overlay?
Let’s assume the logo has an emblem and text. You most likely don’t want everything in the logo to be the same color, right?
You may want the logo to have one color and the text an entirely different color. Using a layer mask, you can make a difference.
First, duplicate the logo. Then, select the new layer and click on the FX icon.
Next, select ‘clear layer style‘.
Next, add a layer mask to the duplicate and select the brush tool to change the foreground to black. Then begin to color the part of the logo you would like to alter.
After doing this, the logo should be changed successfully.
How to Change the Colour of a Logo in Photoshop Using a Hue Saturation Adjustment?
Hue is the gradation of saturated colors. It entails the combination of colors to form another. So, to change the color of your logo, you can also use a color immersion adjustment layer.
When you adjust the color immersion, it adds color variations to the logo. Following this step-by-step guide below, we can create a color immersion adjustment.
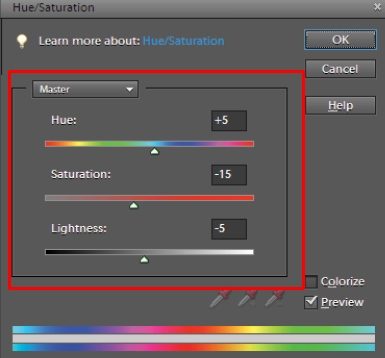
- Step One: First, go to the adjustment panel, click on it and generate a new color immersion adjustment layer. This adjustment layer displays a Master Tab on the interface.
- Step Two: Click on the Master Tab to adjust the hue slider; this affects changes on your logo and gives you your preferred shade.
How to Selectively Apply Colour to the Logo Using Hue Saturation Adjustment?
Suppose the logo has an emblem and text; you most likely don’t want everything in the logo to be the same color. This combination means that the symbol should be one color and the text an entirely different color. Using an adjustment layer, you can easily mask out the specific area.
Next, using the Brush tool change the foreground to black. After selecting the adjustment layer mask, color the part of the logo you want to alter.
After doing this, it will make the hue adjustment clear. The specific logo part has been successfully changed.

Conclusion
Photoshop is a great editing application with thrilling features. It makes it easier to change the color of a logo or any other object. With color-changing techniques like replacing a color tool, color overlay icon and hue saturation adjustment, a graphic designer or even a novice can learn how to change the color of a logo in Photoshop. In any case, we would suggest following the Color Overlay method as it is easier than the others.
Do you need color correction service within 24 hours? So, Contact Us for trail color correction service.