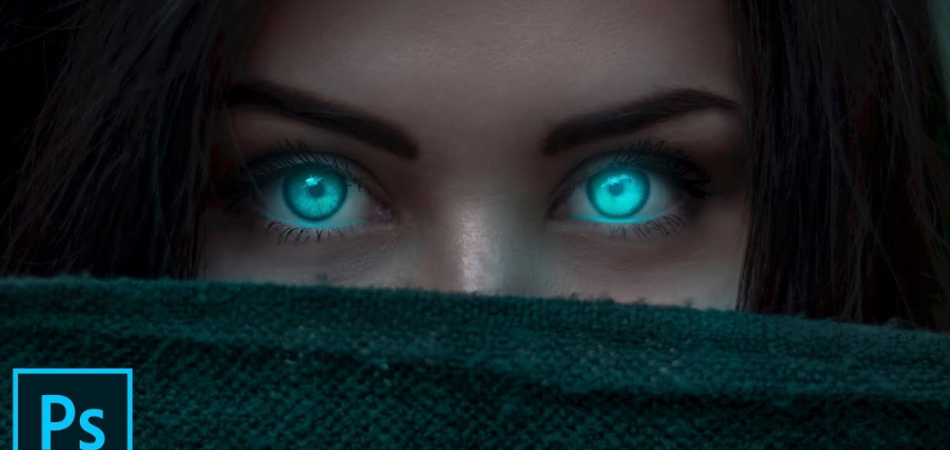
The glowing eye is a very common sight in movies. Fantasy movies often employ the glowing eyes effect to give characters a magical feel. Sci-fi movies also use this effect for the theatrical feel. This effect can easily be done on photos using Photoshop. At the end of this article, you’ll have learned how to do glowing eyes in photoshop.
Photoshop is the most popular photo editing/manipulating software in the photography space. It’s so popular, its name has become a verb; it is very common to hear people say “a photo has been photoshopped” when they see a manipulated photo, whether it was done using Photoshop or not. Photoshop is used by photographers, graphic designers, meme designers, etc. Photoshop offers the easiest and most efficient way to create glowing eyes on photos.
There are many reasons why you would want to edit a photo to give it glowing eyes. For example, you might want to make a SciFi or fantasy movie poster where a featured character possesses it, or you want to make a flyer for a magician’s show, or you probably have a client who just wants it added to his/her photo. Either way, with Photoshop, this is easily achievable.
How to Do Glowing Eyes in Photoshop(Lightning Effect)?
The glowing eyes effect makes photos look cool and magical. This effect can easily be done on Photoshop which is a professional photo retouching and manipulating software
Adobe Photoshop is not the only photo editing application, it’s just the most popular. Other photo editing/ manipulation applications include Canva X, Photoscape X, Fotor, Gimp etc. Photoshop is the most preferred application. This is because its advantages or pros outweigh its cons.
Some of the cons of using Photoshop include the fact that it is difficult to learn how to use it for beginners, as the interface is very complex. Also, new updates tend to come with very extreme changes which may require the user to go through tutorial processes to learn how to use them. Photoshop is also kind of expensive.
The pros of using Photoshop include;
- It can be used for a wide array of edits, more than other photo manipulation software
- Photoshop itself can be used to create graphic designs from scratch
- Photoshop can be expanded using presets and plugins to make it much more expansive
- It has 3D ability with cloud sync
Also coupled with High specialization and customization in editing, the above advantages are the reason why Photoshop is the go-to photo editing software.
If you want to know how to do glowing eyes in Photoshop, then follow the step by step guide below.
- The first step is to open the image in Photoshop. You can do this by either dragging the photo and dropping it on the Photoshop interface or clicking on files and bringing the image from where it is saved.
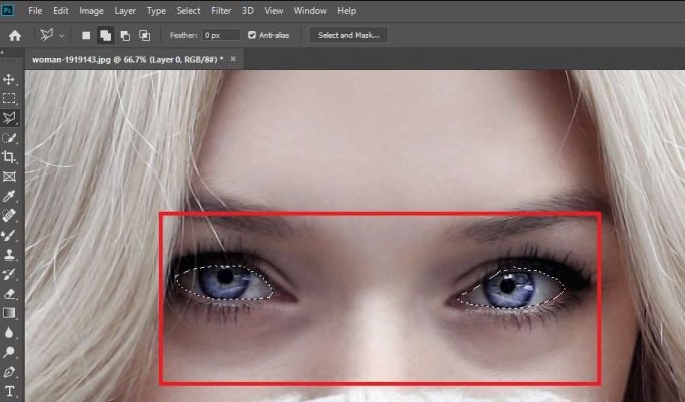
- The next step is to select the eyes on the image. This is done by selecting the white and black parts of the eyes. Only the eyeballs should be selected here. The eyeball is where the glow will be introduced so it should be selected carefully. The selection can be done using a range of tools like Marquee or lasso tool, pen tool, etc.
- After selecting the eyeballs, in the next step, you’ll be creating a new layer. This new layer can be created in the layers panel by clicking on the “new layer icon”
- Fill in the new layer that you just made using white color. This can be done easily by using the paint bucket tool.
- You can now add an outer glow. After filling the eyeballs with the color white in the new layer, then glow needs to be added to make it look brighter. This is done by clicking on the eyeballs and going to blending options. There, the outer glow option should be selected. You can change the color of the glowing light.
- By now, you should already have a magical glowing eyes picture. You can also add inner shadows. Adding inner shadows will make the already glowing eyes look a lot more realistic. This can be done by adding a little inner shadow from the settings.
- After creating the glowing eyes and adding inner shadows to make it look more realistic, lightning effects can also be added to make it look even more attractive. This can be done by importing a lightning image into the document. After that is done, the blending mode of the lightning to screen should be changed. This will help ensure that the lights are more visible, and the darkness hidden.
The lightning should then be arranged close to the eye, in the desired area. Other surrounding elements around the lightning image should be erased. Do this by making a mask of the lightning and removing every other thing around it. Using masks can go a long way in helping you erase and remove unwanted parts of a photo without affecting the needed parts.
- Also, after adding the lightning, it is necessary to make sure its colors match with that of the glowing eyes. This is done by adding a hue/saturation adjustment layer. You can change the hue to change the color of the lightning in order to make it match with the color of the glowing eyes.
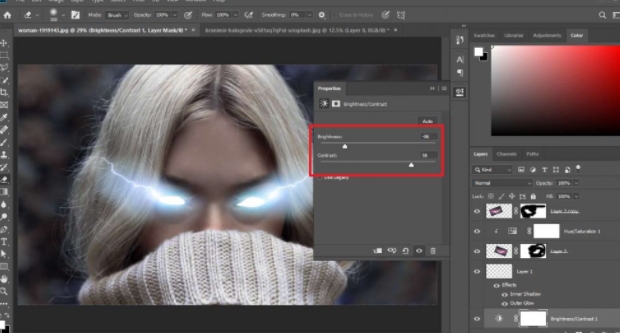
- Knowing just how to adjust lighting will go a long way in making you achieve very realistic results. Also, knowing how to add brightness and contrast adjustment layers will help achieve perfect results. This can be achieved by adding light to some parts of the portrait and darkening other parts. Lowering brightness and increasing contrast are the final touches as we have already made the glowing eyes.
Conclusion
Photoshop is the most popular photo editing/ manipulation software in photography. This article will teach you how to do glowing eyes in Photoshop. These glowing eyes are usually used when creating posters for SciFi or fantasy movies, or when just having fun with Photoshop.