Okay, real talk – who else has wanted to chuck their computer out the window because of Photoshop’s stupid pixel aspect ratio? raises a hand, Yeah, I feel you. That little setting can be a total pain in the butt, messing up all your hard work and leaving your designs looking wonky. But you know what? We don’t have to take that nonsense anymore!
Today, I’m going to let you in on a game-changing secret that’ll have you turning off that pesky pixel aspect ratio quicker than you can say “proportionally perfect graphics.” No more squinting at distorted shapes, no more questioning if things look “off” – just clean, crisp, beautifully proportioned imagery. So grab a snack, get cozy, and get ready to level up your Photoshop game in a major way.
Steps to Turn Off Pixel Aspect Ratio in Photoshop CS6
Turning off the Pixel Aspect Ratio in Photoshop CS6 is a straightforward process that involves a couple of clicks. Follow these simple steps, and you’ll be on your way to creating perfectly proportioned images in no time.
Step 1 – Go to View Panel
First things first, let’s navigate to the View panel in Photoshop CS6. This panel is your gateway to controlling various display settings, including the Pixel Aspect Ratio. Here’s how you access it:
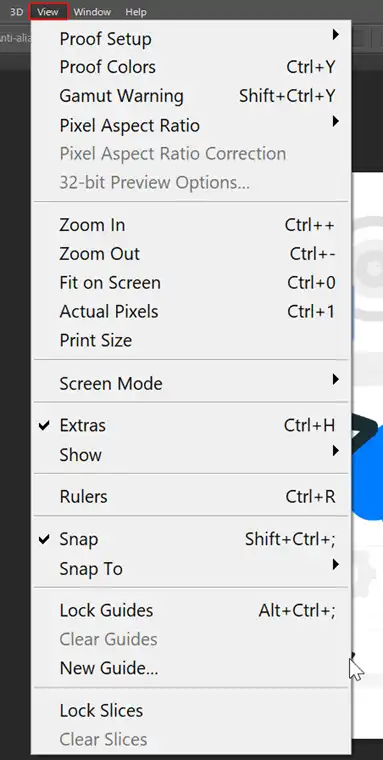
This will open the Panel Options dialog box, where you can find the elusive Pixel Aspect Ratio setting.
Step 2 – Uncheck the Pixel Aspect Ratio Correction Option
Now that you’ve accessed the Panel Options dialog box, it’s time to disable the Pixel Aspect Ratio correction. Here’s what you need to do:
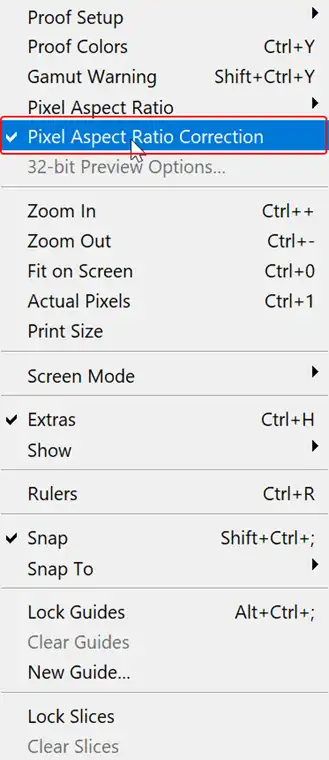
Congratulations! You’ve successfully turned off the Pixel Aspect Ratio in Photoshop CS6. Your images should now maintain their intended aspect ratios, ensuring that your graphics look precise and professional.
Alternative Way
While the steps above provide a straightforward method to turn off the Pixel Aspect Ratio, there’s an alternative approach that some users find more intuitive. Here’s how it works:
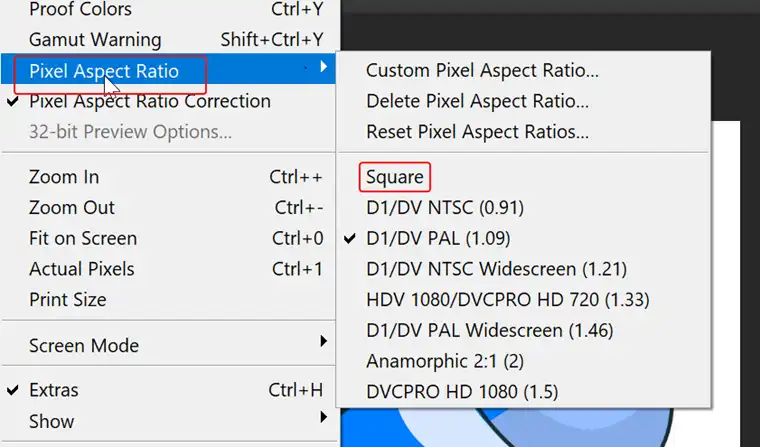
This alternative method essentially resets the Pixel Aspect Ratio to its default square (1:1) aspect ratio, effectively disabling any aspect ratio correction. It’s a quick and easy way to achieve the same result without diving into the Panel Options dialog box.
Bonus Tips – How to Fix Pixel Aspect Ratio Correction is for Preview Purposes Only in Photoshop Error?
Sometimes, even after disabling the Pixel Aspect Ratio correction, Photoshop may still display a warning message stating “Pixel Aspect Ratio Correction is for Preview Purposes Only.” Don’t panic! Here’s a simple solution to resolve this issue.
Go to View > Uncheck Pixel Aspect Ratio Correction: Just like the previous steps, head over to the View menu and uncheck the Pixel Aspect Ratio Correction option. This will display the image in its native aspect ratio, regardless of the warning message.
By following these steps, you should no longer encounter the “Pixel Aspect Ratio Correction is for Preview Purposes Only” error message in Photoshop CS6. Your images will now display accurately, without any aspect ratio distortions.
Why Turn Off Pixel Aspect Ratio Correction?
So, why would you ever want to turn off pixel aspect ratio correction? Here are a few reasons:
- Accuracy: If you’re working on an image where precise dimensions are crucial (like designing for print), you might want to see the image in its exact, uncorrected aspect ratio. Disabling pixel aspect ratio correction ensures you’re editing the image based on its true dimensions.
- Editing Freedom: Sometimes, the automatic correction can distort the image in ways you don’t want. Turning it off gives you more control over how the image appears during editing.
- Export Considerations: If you plan to export the image for a specific use case where the aspect ratio matters (like social media or a specific website layout), disabling correction allows you to maintain the original aspect ratio for export.
Conclusion
Boom, just like that, you’ve got the pixel aspect ratio issue handled in Photoshop CS6. Easy peasy, right? No more messing around with distorted images or skewed proportions. From now on, it’s nothing but perfectly proportioned graphics for you, my friend. So keep this little trick in your back pocket, and feel free to share it with any other Photoshop pals who might be struggling with the same problem. We’re all on this creative journey together, and every design ninja deserves to have flawless aspect ratios at their fingertips. Keep killing it out there, and happy designing!
FAQs
How do I fix the pixel aspect ratio in other versions of Photoshop?
The procedure for fixing the aspect ratio is the same for every version of Photoshops. It won’t matter which version you are using, just follow the mentioned procedure in the article, and you are good to go.
Why is the pixel aspect ratio important in Photoshop?
The pixel aspect ratio is crucial because it determines how pixels are displayed on screen or in print. If the aspect ratio is incorrect, your images and graphics may appear distorted or stretched, which can ruin the overall design and proportions. Ensuring the proper aspect ratio is essential for maintaining accurate dimensions and shapes in your work.
Can I set a custom pixel aspect ratio in Photoshop?
Yes, you can set a custom pixel aspect ratio in Photoshop to ensure consistency across your projects. To do this, go to the View > Pixel Aspect Ratio > Custom Pixel Aspect Ratio. Here, you can choose your preferred aspect ratio from the dropdown menu under “Pixel Aspect Ratio.”
Does deleting the pixel aspect ratio bring it back to the default ratio?
Unfortunately, deleting or resetting the pixel aspect ratio in Photoshop won’t restore it to the default square (1:1) aspect ratio. You will need to follow the procedure to turn the thing off or back in the default setting,
