Pixels are the tiny building blocks that makeup all our digital images and graphics. You might think they’re just simple little squares, but there’s a setting in Photoshop that can transform those pixels into rectangles – the Pixel Aspect Ratio (PAR). It’s an often overlooked feature that can greatly impact how your visuals appear.
Don’t worry, I won’t bombard you with technical jargon. Instead, I’ll guide you through understanding Pixel Aspect Ratio (PAR), why they matter, and most importantly, how to master them in Photoshop. Get ready to dive into this nerdy but essential topic and become a pixel pro!
What is the Pixel Aspect Ratio in Photoshop?
To understand the Pixel Aspect Ratio (PAR), we first need to grasp what pixels are and how they form digital images. A pixel is the smallest unit that makes up a digital image or graphic. Now, what is the Pixel Aspect Ratio (PAR) or PAR? Pixel Aspect Ratio (PAR) in Photoshop refers to the shape of the individual pixels in your image, not the overall image aspect ratio. Most of the time, pixels are square (1:1 aspect ratio). However, some video formats use non-square pixels.
Here’s a breakdown of Pixel Aspect Ratio (PAR) in Photoshop:
Square Pixel Aspect Ratio (PAR) (1:1)
In Photoshop’s default settings, each pixel is a perfect square, meaning its width and height are equal. This is known as a square Pixel Aspect Ratio (PAR) of 1:1. When all pixels have this square shape, the image will appear undistorted and proportional on modern digital displays like computer monitors, smartphones, and tablets.
For instance, consider a simple 100 x 100 pixel image in Photoshop with a 1:1 aspect ratio. Each of the 10,000 pixels that make up this image is a perfect square. When displayed on a device with a square Pixel Aspect Ratio (PAR), such as a modern LCD screen, the image will appear as a perfect square, with no distortion.
Non-Square Pixel Aspect Ratio (PAR)
While square pixels are the norm today, there were times when non-square Pixel Aspect Ratio (PAR)s were used. These ratios define pixels as rectangles rather than squares, with the width and height being different values.
One common example is the NTSC (National Television System Committee) video standard, which was widely used for analog television broadcasting in North America. NTSC had a Pixel Aspect Ratio (PAR) of 0.9:1, meaning each pixel was slightly wider than it was tall. This non-square ratio was designed to compensate for the display limitations of CRT (cathode ray tube) televisions at the time.
Let’s consider an example: Suppose you have a 720 x 480 pixel image in Photoshop, intended for NTSC video. With the default 1:1 aspect ratio, this image would appear stretched horizontally when displayed on an NTSC television or video player. However, by setting the Pixel Aspect Ratio (PAR) to 0.9:1 (NTSC), the image will be displayed correctly, with the proportions maintained.
Another example of a non-square Pixel Aspect Ratio (PAR) is the PAL (Phase Alternating Line) video standard, commonly used in Europe and other regions. PAL had a Pixel Aspect Ratio (PAR) of 1.067:1, meaning the pixels were slightly taller than they were wide. This ratio was also designed to accommodate the specific characteristics of CRT displays used in PAL territories.
Why Should You Care About Pixel Aspect Ratio (PAR) in Photoshop?
You might be wondering – why does Pixel Aspect Ratio (PAR) even matter? Can’t you just design everything at the default 1:1 square ratio?
Well, there are a few crucial reasons why understanding and setting the proper Pixel Aspect Ratio (PAR) in Photoshop is important:
- Avoiding Distortion: If you work with an incorrect Pixel Aspect Ratio (PAR), your images or graphics will appear distorted when displayed on their intended output. For example, if you create a graphic with a square Pixel Aspect Ratio (PAR) but display it on an NTSC television without adjusting the ratio, it will appear horizontally stretched.
- Video Integration: When creating graphics or visual effects for video projects, ensuring the Pixel Aspect Ratio (PAR) matches the video standard is crucial. If the ratios don’t align, your Photoshop graphics will look distorted or skewed when composited into the video footage.
- Maintaining Consistency: Some projects may require assets to be compatible across multiple video standards, broadcast regions, or display types. By setting the appropriate Pixel Aspect Ratio (PAR) in Photoshop, you can ensure consistent rendering and proportions across these different formats.
- Archiving Legacy Content: If you’re working with older graphics, footage, or assets intended for legacy displays or video systems, utilizing the original non-square Pixel Aspect Ratio (PAR) is essential for preserving the accurate appearance of that vintage content.
Ignoring Pixel Aspect Ratio (PAR) can lead to visually subpar graphics that appear stretched, squished, or disproportionate, effectively undermining the integrity of your work.
Which Pixel Aspect Ratio (PAR) Is Perfect For Your Photos?
When you go to correct the PAR, it gets a bit overwhelming due to all the menu options. Because Pixel Aspect Ratio (PAR) relies heavily on the type of frame you are using.
Moreover, you need a different PAR, if the aspect ratio of the frames doesn’t match. And, each option on that list is there to serve a specific frame requirement. That’s why you should know what each of these options refers to.
Here’s a quick guide to help you.
| Menu Options | Resolution | DAR (display Aspect Ratio) | PAR (Pixel Aspect Ratio (PAR)) |
| Square | 640x480p | 4:3 | 1 |
| D1/DV NTSC | 720x480p | 4:3 | 0.9 |
| NTSC Widescreen | 720x486p | 16:9 | 1.2 |
| PAL D1/DV | 720x576p | 4:3 | 1.067 |
| PAL WideScreen | 720x576p | 16:9 | 1.422 |
| Anamorphic | – | 2:1 | 2 |
As you can see, if you want to keep the PAR to 1, select the square pixels option. If the display has a 16:9 aspect ratio and uses NTSC standard, pick the NTSC widescreen option. This table should help you identify all of that.
In case, you are still not sure which one is the best, stick with the square. This PAR works with most frame types. Because 4:3 is the most widely used aspect ratio. it won’t make your image look distorted even on an NTSC D1/DV or PAL D1/DV. Hope that helps.
How To Change The Pixel Aspect Ratio (PAR) In Photoshop?
If you are not happy with the Pixel Aspect Ratio (PAR), here’s a quick tutorial for you. Also, we have kept the process simple and straight. Check it out.
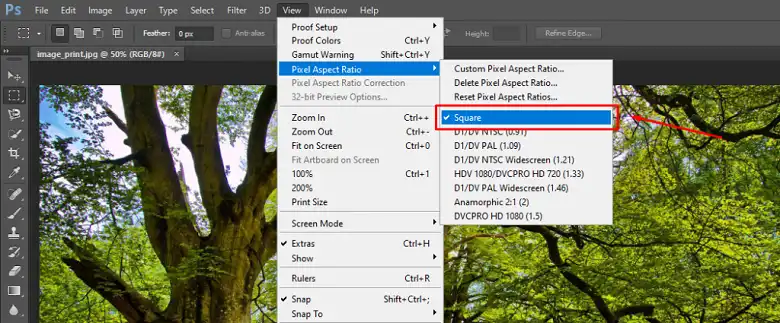
Step 1: Open The View Tab
First of all, open the image in your photoshop software. Now, click on the view tab. It should be on the bar above the picture. Once you expand the view tab, it will show you a list like this. Click on the Pixel Aspect Ratio (PAR).
Step 2: Select a PAR
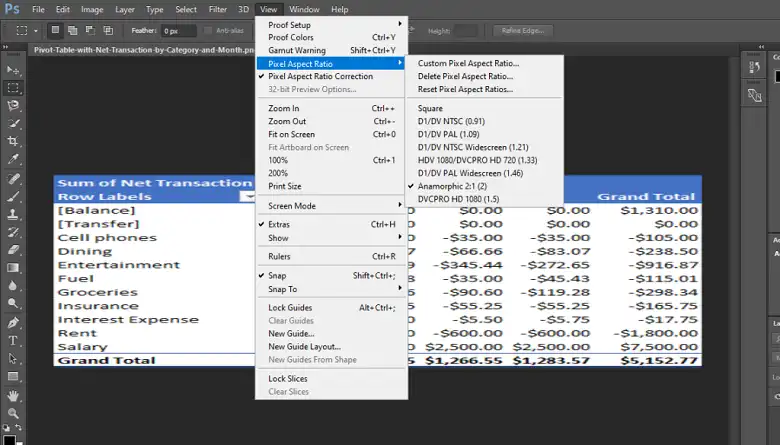
Once you click on Pixel Aspect Ratio (PAR), another list will appear. Here, you can see all the standard output types. The square option will be selected by default. But, you can change that by selecting another standard. If you want the image to match a D1 standard, click on D1/DV NTSC.
Next, go back to your image. The image won’t look distorted anymore.
How Do You Turn Off Pixel Aspect Ratio (PAR) In Photoshop?
Now, to turn it off, keep following the above method till you find the Pixel Aspect Ratio (PAR) option. If you have changed the PAR before, you will notice a tick beside the Pixel Aspect Ratio (PAR) correction.
In that case, just click on the tick again to uncheck it. Now, if you select the Pixel Aspect Ratio (PAR), and you can see the square option is selected by default again.
Here is a quick tip: Don’t crop the photo to get rid of the pixel correction. Since the pixel’s shape has changed, cropping the sides won’t help much.
What To Do If The Photoshop Software Doesn’t Allow Non-Square Pixels?
That’s a very common question. You might want to change the PAR for your clips following our method. However, the application doesn’t allow any input to create a rectangular pixel. What can you do now?
Well, our first suggestion would be to switch your Photoshop application. That would save you a lot of hassle. If that’s not possible, we have a small trick to share.
Suppose the final display screen needs a resolution of 720x480p. That would require 0.9 PAR according to the table above. Since, you can’t apply that ratio, create a larger file than necessary. That means, instead of 720x480p, you make a 720x540p file.
That way, when you project the file on the final output, it will automatically be downsized. It is like distortion but in a good way. the larger file’s pixels will become narrower to fit the screen and that will give us the ideal PAR of 0.9.
As for the 720x486p, reformat your file into 720x576p. You should definitely try this trick.
Conclusion
There you go, folks – a detailed guide to understanding and taming pixel aspect ratios in Photoshop. I know it might have seemed confusing at first, but mastering this setting is crucial for ensuring your images look perfect across different displays and devices.
Always set the proper aspect ratio – square for modern displays or non-square for video, multimedia, and legacy content. Ignoring this can lead to distorted, stretched visuals that undermine your hard work. If you have any questions, feel free to ask in the comments.