Masking is a crucial tool in Photoshop. It lets you control which parts of an image are visible or hidden. Masking opens up many creative possibilities. It allows seamless blending of images and detailed image editing. This article will guide you through the various masking techniques in Photoshop. I’ll cover major methods like layer masks, vector masks, and clipping masks. I’ll also explore more specialized approaches. Get ready to fully unlock the power of masking in your Photoshop workflow!
What are the Major Maskings in Photoshop?
The major masking techniques in Photoshop are layer masks, vector masks, and clipping masks. These tools allow you to selectively hide or reveal portions of an image or layer and enable precise control over your editing and compositing processes.
Layer Mask
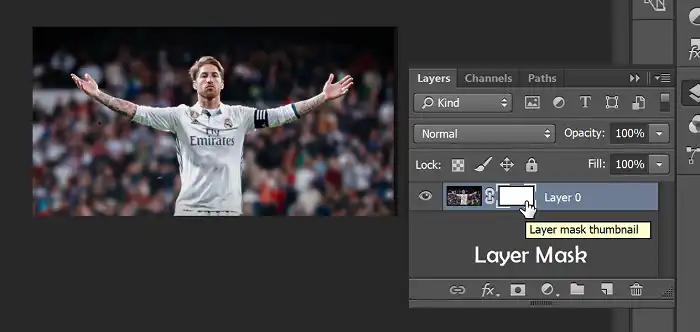
Layer masks are one of the most versatile and widely used masking techniques in Photoshop. They provide a non-destructive way to selectively hide or reveal portions of a layer by painting on a mask with black or white. The process is straightforward: create a layer mask, typically represented by a white thumbnail next to the layer thumbnail in the Layers panel.
When you paint on the layer mask with black, you’re hiding the corresponding areas of the layer content. Conversely, painting with white reveals those areas. The beauty of layer masks lies in their flexibility – you can paint with varying shades of gray to control the opacity of the masked areas, creating smooth transitions and blending effects.
Here’s what makes Layer Masks fantastic:
- Non-destructive editing: Edits are applied to the mask, not the actual layer pixels, keeping your original image data safe.
- Flexibility: You can refine the mask with various selection tools and brushes, giving you ultimate control over the revealed areas.
- Gradual transitions: The ability to use shades of gray creates realistic and natural-looking edits.
Layer Mask is your go-to choice for tasks like:
- Isolating objects for background replacement.
- Fading out unwanted elements in an image.
- Creating smooth vignettes or selective edits.
Vector Mask
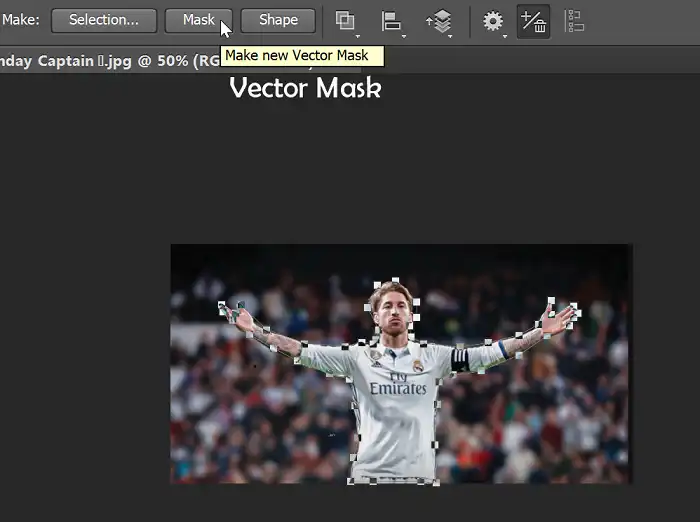
Vector Masks are like the slightly cooler cousins of Layer Masks. Instead of pixels, they use precise paths to define the masked area. You can create vector masks from shape layers, text layers, or by converting a selection into a vector mask.
Here’s why Vector Masks deserve a spot in your toolbox:
- Sharp edges: Perfect for clean selections with crisp, defined lines, ideal for objects with straight edges or geometric shapes.
- Scalability: Vector paths can be resized without losing quality, making them fantastic for high-resolution projects.
- Easy adjustments: You can easily edit the path itself to refine your selection.
Vector Masks come in handy for:
- Isolating objects with clean edges, like buildings or text.
- Creating sharp shapes or cutouts.
- Masking complex shapes with smooth curves.
Clipping Mask

Clipping masks are a unique type of masking technique that allows you to use the transparent areas of one layer to mask the layers below it.
Clipping masks are incredibly versatile and can be used in a variety of scenarios. For example, you can use a clipping mask to apply a texture or pattern to a specific shape or area of an image, or to create a frame or border around an object. You can also use clipping masks to create interesting text effects by clipping text layers to shape layers or images.
Here’s what makes Clipping Masks unique:
- Simple workflow: Perfect for quick masking tasks, especially when the top layer has a well-defined shape.
- Live updates: Changes to the top layer automatically update the masked area, keeping things efficient.
- Non-destructive editing: Edits are applied to the top layer, leaving the lower layer intact.
Clipping Masks are great for:
- Placing images inside shapes, like text or vector objects.
- Creating photo collages with pre-made shapes.
- Masking simple shapes onto backgrounds.
What are the Other Types of Maskings in Photoshop?
While layer masks, vector masks, and clipping masks are the most commonly used masking techniques in Photoshop, there are several other masking methods available, each with its own unique characteristics and applications.
Alpha Channel Masking
Alpha channels are a way to store mask information separately from the image layers. They are essentially grayscale representations of the transparency or opacity levels in an image, where black represents fully transparent areas and white represents fully opaque areas.
You can create, edit, and apply alpha channel masks to control transparency or create complex selections. Alpha channel masks are particularly useful when working with intricate shapes or fine details that may be challenging to select or mask using other methods.
Transparency Masking
Transparency masking involves using the transparency or opacity levels of an image or layer to create a mask. This method is useful when you want to isolate a specific area of an image based on its opacity or transparency levels, such as separating a foreground object from a transparent background.
Transparency masking is particularly useful when working with images that contain semi-transparent or translucent elements, such as glass, water, or smoke. By isolating these areas based on their opacity levels, you can selectively apply adjustments, effects, or compositing techniques to specific regions of the image.
Smart Masking
Smart masking, also known as Smart Radius or Smart Edge, is an intelligent edge detection tool that helps create precise masks around objects or areas of an image. It analyzes the image’s colors, contrasts, and edges to automatically generate a mask that closely follows the boundaries of the desired object or area.
Smart masking is particularly useful when working with complex subjects like hair, foliage, or intricate textures, as well as in situations where you need to quickly and accurately isolate objects from their backgrounds.
3D Masking
3D masking is a feature in Photoshop that allows you to create masks based on the depth information of 3D objects or scenes. This technique is handy when working with 3D models, renderings, or scenes, as it enables you to isolate and manipulate specific elements based on their depth or position in the 3D space.
With 3D masking, you can create depth maps or depth mattes that represent the relative distances of objects or surfaces from the camera or viewpoint. These depth maps can then be used to create precise masks that selectively target objects or areas based on their depth values.
Path Masking
Path masking involves using vector paths to create precise masks around objects or areas of an image. You can draw paths around the desired elements using Photoshop’s pen tools or create paths from existing selections or shapes.
One of the advantages of path masking is its precision and editability. Unlike pixel-based masking techniques, vector paths can be easily adjusted, scaled, or transformed without losing quality or introducing unwanted artifacts. This makes path masking ideal for creating masks that need to be resized or applied to different resolutions or contexts.
Translucent Image Masking
Translucent image masking is a technique that uses the transparency or opacity levels of an image to create a mask. This method is useful when you want to isolate a specific area of an image based on its opacity or transparency levels, such as creating masks for glass, water, or other semi-transparent objects.
Translucent image masking is particularly useful when working with images that contain semi-transparent or translucent elements, as it allows you to selectively apply adjustments, effects, or compositing techniques to these specific areas. For example, you could use a translucent image mask to enhance the refraction or reflection effects on a glass object, or to selectively adjust the colors or opacity of water or smoke elements in an image.
Collage Masking
Collage masking involves combining multiple images or elements using various masking techniques to create a cohesive composite image. This technique is commonly used in graphic design, collage art, or when creating surreal or fantastical imagery.
Collage masking often involves combining various masking methods, such as layer masks, vector masks, clipping masks, and transparency masks, to achieve the desired result. The process typically involves isolating or extracting elements from different source images and then compositing them together in a new document or scene.
Collage masking allows for a high degree of creativity and artistic expression, as you can combine disparate elements, textures, and styles to create unique and visually striking compositions.
Wrapping Up
Learning to master masking techniques in Photoshop is a game-changer. It allows you to isolate objects with precision and create stunning composite images. The possibilities are endless with masking. Experiment with the different masking methods covered in this article. Find the ones that work best for your needs. Combining techniques can lead to even better results. If you have any remaining questions, feel free to leave a comment. This article aimed to share knowledge and help Photoshop users on their masking journey. Thank you for reading about Photoshop’s masking capabilities. Keep creating, keep learning, and happy masking!