Applying clipping masks in InDesign is an easy and fun technique that can take your designs to the next level. In this guide, I’ll show you how to combine images with text or shapes to create visually striking compositions. Don’t worry, it’s a straightforward process that anyone can master. By following the simple steps, you’ll be able to incorporate images into your work in creative ways that make your designs truly stand out. Get ready to impress with unique and eye-catching layouts. Let’s get in and learn how to do clipping masks in InDesign!
Steps for Applying Clipping Mask in Letters in InDesign
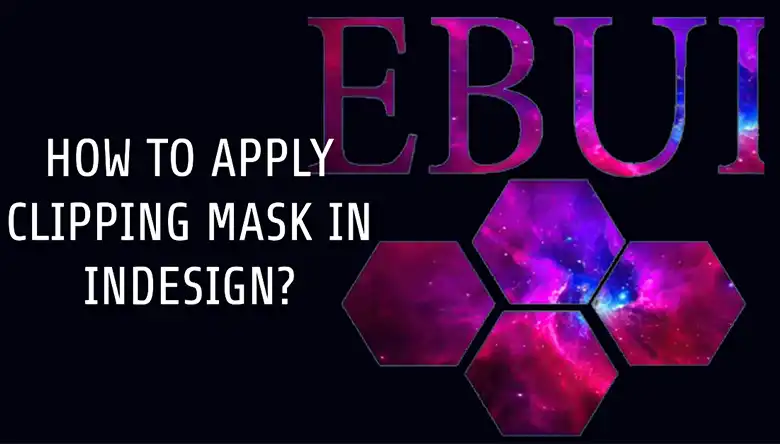
Clipping masks in InDesign allow you to create visually striking text effects by inserting images within the outlines of text. This technique adds depth and interest to your designs, making them stand out from traditional text layouts.
Step 1 – Click on Text and Type What Ever You Want
Let’s say you want to put an image inside text or create a text mask effect. The first thing you need to do is type out the text you want to use. You can choose any font style and size that suits your design. Click on the Text tool and type.
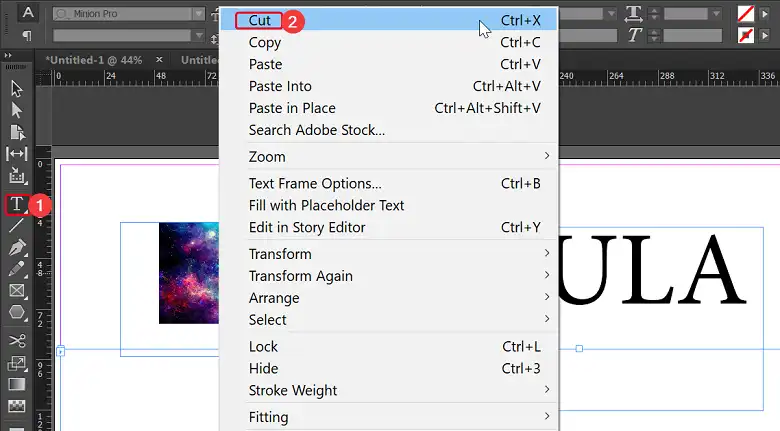
Once you have the text ready, insert the image you want to place inside the text. Right-click on the image and select Cut to remove it from the artboard temporarily.
Step 2 – Create Outlines
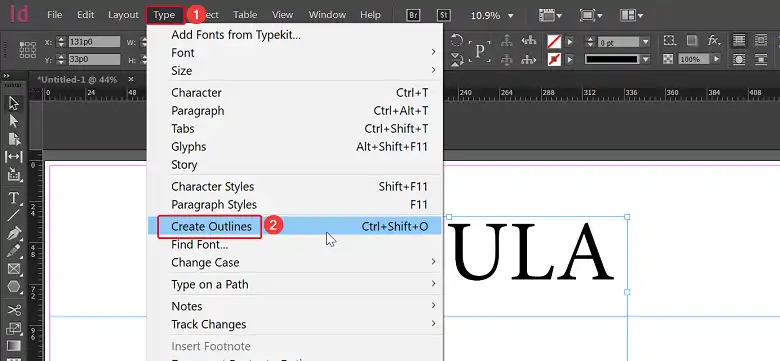
With the text selected, go to the Type menu and choose Create Outlines. This will convert your text from editable characters to vector shapes. This step is crucial because you can only apply clipping masks to vector objects, not text frames.
Step 3 – Apply Clipping Mask
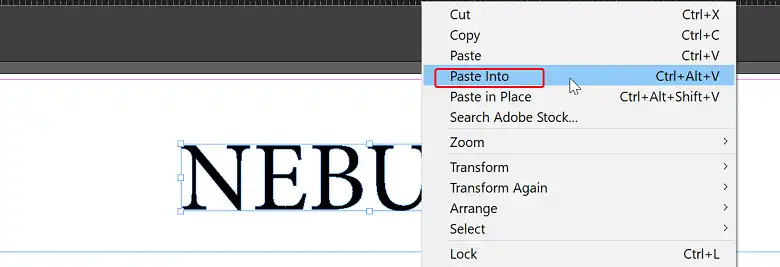
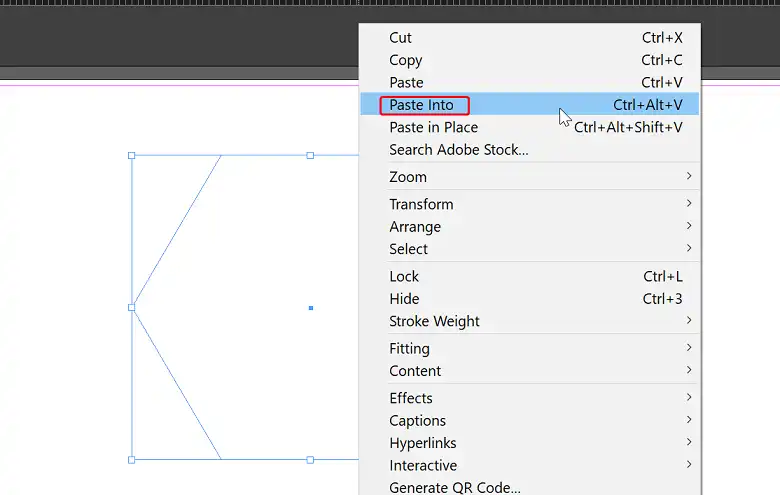
Right-click on the outlined text and select Paste Into. This will place the image you previously cut inside the text outlines, creating a clipping mask effect. The image will only show through the shapes of the letters, giving you a cool text mask design.

Steps for Applying Clipping Mask in a Single Shape or Multiple Shapes in InDesign
Clipping masks can also be applied to shapes, allowing you to incorporate images into specific areas of your design. This technique offers a wide range of creative possibilities, from simple shape masks to complex, multi-shape compositions.
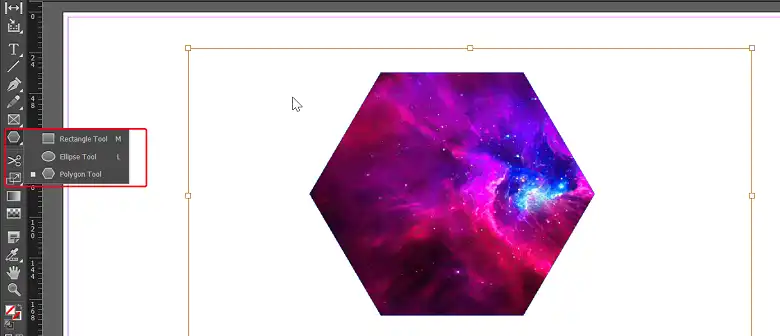
Step 1 – Insert the Shape and Picture
First, you’ll need to create the shape or shapes you want to use as the clipping mask. Go to the Rectangle or Ellipse tool and draw the desired shape on your artboard. You can also use the Polygon tool to create custom shapes.
Next, insert the image you want to appear inside the shape. Right-click on the image and select Cut to remove it from the artboard temporarily.
Step 2 – Apply Clipping Mask
Right-click on the shape and select Paste Into. The image will now be clipped inside the shape, creating a clipping mask effect.
For Multiple Shapes
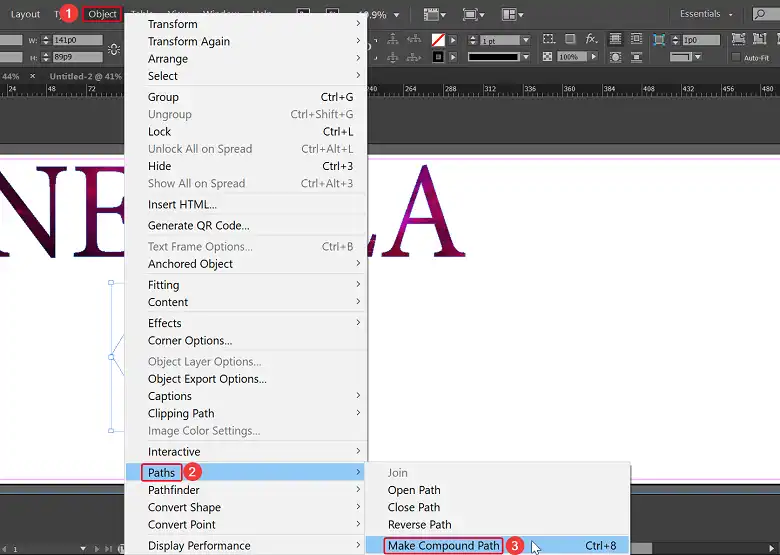
If you want to use multiple shapes as a clipping mask, follow the first step to create all the shapes you need. Then, select all the shapes and go to Object > Paths > Make Compound Path. This will combine all the selected shapes into a single vector object.
With the compound path still selected, right-click and choose Paste Into. The image will now be clipped inside all the combined shapes, creating a more complex clipping mask design.

FAQs
Can I use clipping masks with text frames directly?
Unfortunately, not quite. InDesign requires text to be converted into outlines (using Type > Create Outlines) before it can be used as a clipping mask.
Is it possible to edit the image after applying the clipping mask?
Absolutely! You can still edit the original image even after applying the clipping mask. Just select the clipping mask shape (not the image peeking through) and double-click it. This will open the original image in a separate window for editing.
Can I use clipping masks with gradients or other fills?
InDesign clipping masks work best with solid color or black and white fills. Gradients or complex patterns might not translate well through the clipping mask.
Wrapping Up
There you go! I’ve shown you how to apply clipping masks in InDesign. You learned about using them with text and shapes. Clipping masks open up so many possibilities for your designs. You can get really creative by mixing images with other elements. Don’t be afraid to play around and experiment. Feeling stuck? Have any questions? Don’t hesitate to leave a comment below – the InDesign community is always happy to help a fellow designer out. Happy masking!