Let me start out by saying I totally get the frustration when you’ve got extra unseen stuff cluttering up your images after masking. It’s like I just wanted to clip part of this pic, why is all this hidden junk still lurking out there, right? I feel you!
Well, today I want to share a quick little trick for how to banish that extraneous clutter once and for all working in Adobe Illustrator. It just takes selecting one easy option to crop away all that picture flab and tighten things up clean as a whistle! Interested to know more? Read on and I’ll walk you through it.
What Issue Can be Faced if Everything Outside the Clipping Mask isn’t Deleted?
If you don’t delete everything outside the clipping mask, the following problems may occur:
Excess Data
The unseen objects, shapes, or image portions outside the clipping path will still be present in the file. This excess unseen data can greatly increase your file size. Large files take longer to export or print and are more difficult to share or email to others.
Accidental Changes
With unused objects still present outside the clipping path, it’s easy to accidentally select and move these objects later. This can inadvertently modify your design in ways you did not intend. Deleting outside content prevents any unwanted changes.
Printing Issues
If you try to commercially print a design with a clipping mask, any objects or image areas outside the clipped region may get printed too. This can add unwanted elements as well as increased printing expenses if the printer has to use more materials.
Rendering Problems
Similarly, if you export your clipping masked layout to web or video formats, hidden objects could reappear or cause rendering artifacts in the final files. Deleting everything outside prevents this.
So in summary, failing to remove content outside a clipping path can lead to bloated files, accidental design changes, printing errors, and rendering problems. Fortunately, deleting this external content is easy to do in most graphic apps.
Steps for Deleting Everything Outside the Clipping Mask in Adobe Illustrator
Deleting everything outside a clipping mask in Adobe Illustrator is very simple by using the Pathfinder crop option:
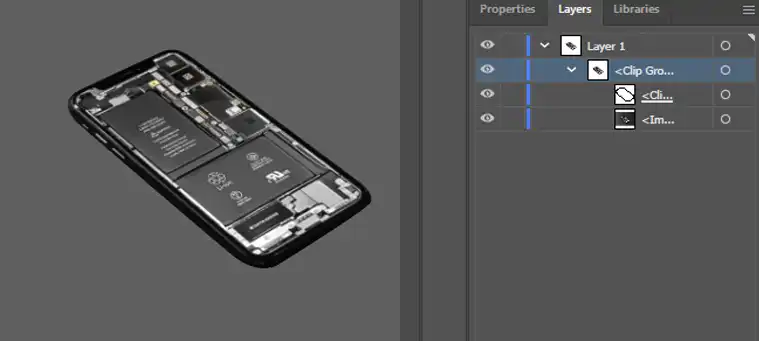
Step 1 – Once your desired clipping mask effect is complete, open the Layers panel and then click on clip group to expand. Now, select the compound clipping path layer, drag it, and place it just under the Layer 1, above the Clip Group sub layer.
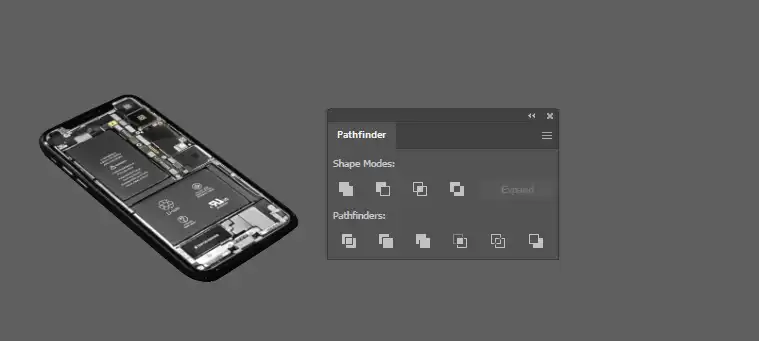
Step 2 – With the compound clipping path layer selected, click on the Pathfinder option in the right toolbar to open the Pathfinder panel. You can locate the Pathfinder tool grouped with other vector operation icons at the top of the Illustrator workspace.
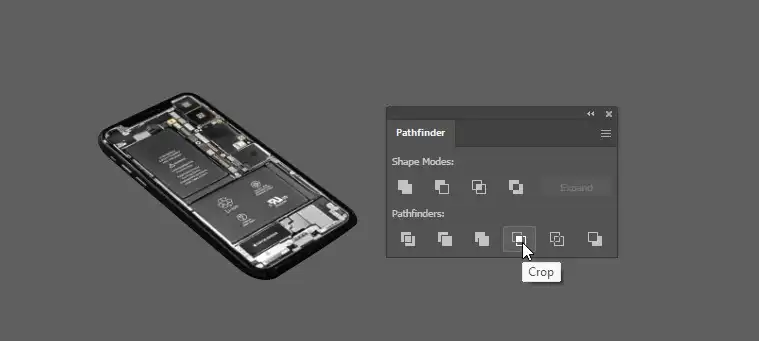
Step 3 – In the opened Pathfinder panel, click on the Crop button. This Crop function will now trim and delete any portions of the underlying image that lie outside the boundaries of your selected clipping path. Essentially, it crops the hidden background image to perfectly match the shape of your clip mask. So all external unwanted image areas are removed for good!
This quick Pathfinder method ensures you have full control over deleting content outside complex clipping groups in Adobe Illustrator. Just be sure to select the clipping path itself first before cropping, and all excess imagery outside the mask will disappear.
Conclusion
In just a few simple clicks, you can say “be gone!” to all that hidden masking mess outside your intended path. Now your images can shine crisp and clean thanks to the power of Pathfinder’s crop button. I hope you feel empowered to keep your clipping projects nice and tight moving forward!
Let me know if any other questions come up. And don’t forget – masks are super useful, but we gotta show ’em who’s boss once the cropping’s done! Happy Illustrating everyone!