Procreate is home to illustrators and artists. It has impressive background removing ability along with other tons of features. However, removing image background using Procreate is a trick that is not known to many.
If you’re wondering how to remove background using Procreate, you’re in the right place. While it may seem like a confusing idea, it is pretty simple, and all it takes is a few easy steps. Let’s find out what they are. I’ll throw in a few pro tips along the way as well.
Do you need a professional background removal service? Clippingfly would be the best option for you. Check out our service page for more info on background removal.
How To Remove Background Using Procreate?
Removing the background from an image using Procreate is relatively easy, and here, we will discuss four simple background removal methods in detail.

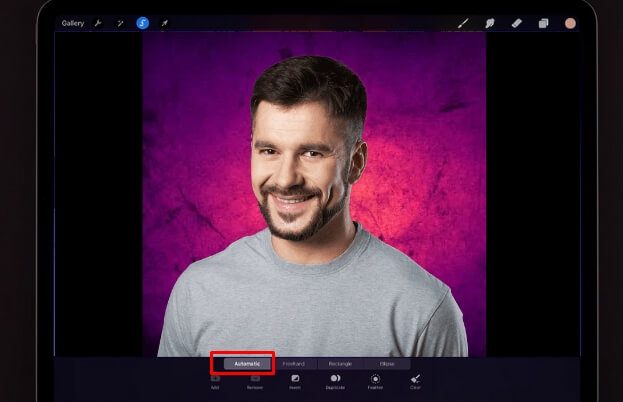
1. Automatic Selection Tool
First and foremost, let us talk about the automatic selection tool of Procreate. It is an easy way of removing the background of any image. However, this one works explicitly if the background does not have intricate details, and the photo’s object can be easily identified and marked.
The steps that the method follows are:
- Open a new canvas on Procreate and insert the image you want to work on.
- Fit the image according to the size of the canvas, as this will make it easier for you to work on the background.
- Click on the Procreate selection tool and adjust the setting to Automatic.
- With the tool, click on the background and start selecting.
- Swipe your finger on the pen across the screen and mark the entire background, making sure that you do not select any section of the subject.
- Once you have marked the entire background, click on Invert, and this will change the selection from the background to the subject.
- Add a new layer to the canvas and copy the image’s subject.
- Move to the new layer you added and paste it there.
- Click the eye icon on the original layer and turn it off. You will notice that the new layer has a transparent background and the subject of your image.
Tip: After removing the background, if you notice any parts or pieces left behind, you can easily clean it up with the help of an eraser.
2. Procreate Eraser Tool
While this is a time-consuming method, it typically works best for images that have a detailed background. The steps to remove background with Procreate eraser tools are as follows:
- Open a new canvas on the app and insert the image from which you want to remove the background.
- Select the eraser tool and adjust the opacity to the highest setting.
- Adjust the size of the eraser according to your preference and zoom in on the subject.
- Start erasing the background carefully around the subject with small strokes.
- Once the area around the subject is removed, increase the size of the brush and remove the remaining background.
Tip: Using small strokes will reduce the chances of making a mistake while removing the background. You can also press the undo and work on it again if you make a mistake.
3. Freehand Selection Tool
There are often instances when the subject of the image is too detailed, or there are quite a few objects you need to keep on the final copy. In cases like these, the eraser or automatic selection tool is not 100 percent accurate. And this brings us to our following method, the freehand selection tool.
Let us take a look at how this method works.
- Open a new canvas in Procreate and import the image from your gallery.
- Fit the image according to the size of the canvas to get a more accessible working space.
- Select the selection tool of the app and adjust it to freehand selection.
- Zoom in on the image and carefully outline the entire subject of your image.
- Copy the outline once it is complete.
- Add a new layer and paste the subject outline on the new layer.
- Turn off the original layer, and you will have the subject on the new layer without a background.
Tip: After pasting the subject on the new layer, take the eraser tool and clean up the edges properly for a perfect finish.
4. Combination Of Freehand Selection and Eraser Tool
Last but not least, we will discuss a combination of two background removal tools in Procreate. You can use this method if the image has a detailed background but do not want to go through the time-consuming process depending on the eraser tool. The steps in this method are:
- Open a new canvas and insert the image you want to edit.
- Resize the picture and align it with the size of the canvas.
- Select the freehand selection tool from the options and loosely outline the image’s subject.
- Copy the outline and paste it onto a new layer.
- Turn off the original layer on the canvas and select the eraser tool.
- Zoom in on the picture and adjust the size of the eraser.
- Erase the remaining background around the subject carefully.
Bottom Line
Procreate is an outstanding software and removing the background of an image is quite simple. Now that you know how to remove background using Procreate, you can easily do it by following any of the above methods. However, if you do not want to remove the background by yourself, you can also take help from any professional Image Background Removal Service.