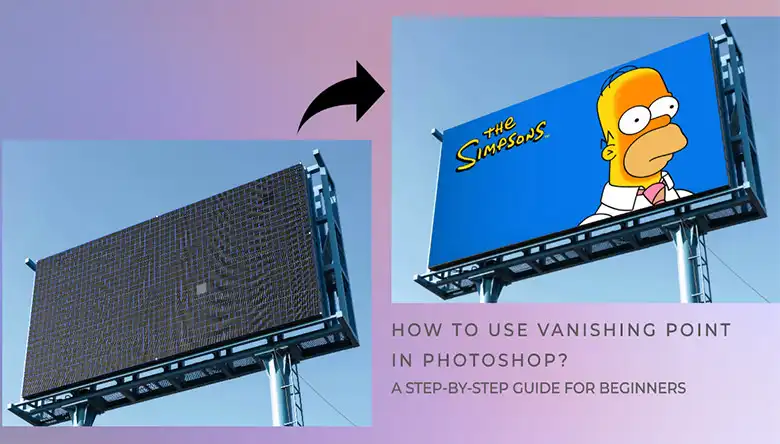
Ever wanted to make an image look like it’s wrapped around a corner or placed on an angled surface? That’s exactly what the Vanishing Point tool in Photoshop lets you do. It’s about taking a flat image and mapping it onto a 3D plane. Pretty cool, right?
In this guide, I’ll explain in simple terms how to use Vanishing Point to place your images onto 3D planes and surfaces. Don’t worry, there’s no complicated jargon – just straightforward steps anyone can follow. By the end, you’ll know how to make images appear perfectly perspective on walls, floors, signs and more. It adds a really cool 3D effect that makes graphics pop off the surface. Get ready to take your image editing skills to a whole new dimension!
Steps for Using the Vanishing Point Tool in Photoshop
Creating a vanishing point in Photoshop is straightforward. It is mostly used to convert 3D plane workstations for editing and illustrating one once placed on a selected parameter. Before doing that, you need an illustration that supports an angled perspective for aligning with the vanishing points.
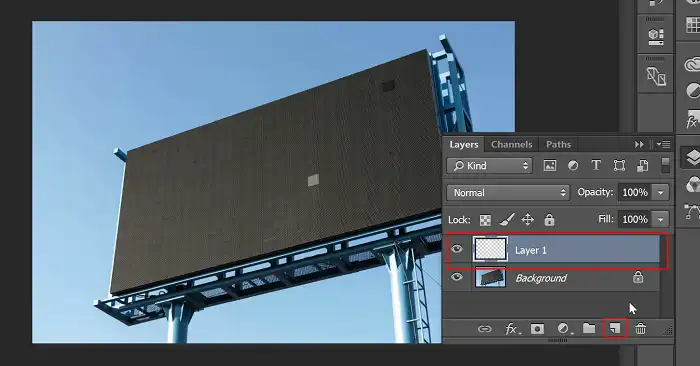
Step 1: Open the Image in Photoshop and Create a New Layer
Start by opening the images in Photoshop. After opening it, create another layer for using the vanishing point. You will need to use the new layer for editing purposes.
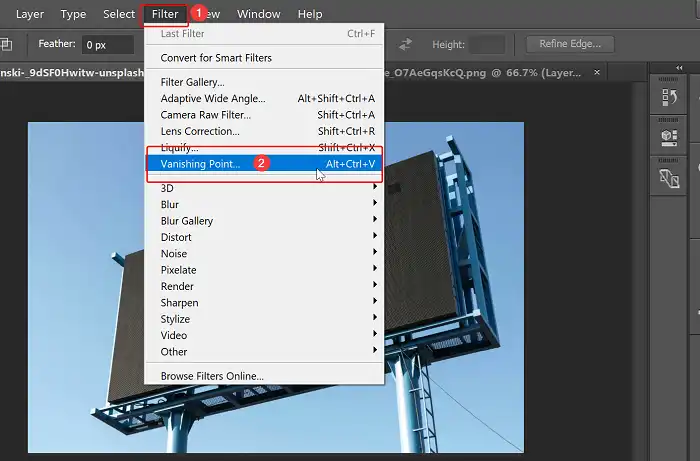
Step 2: Get Access to the Vanishing Point and Define the Panel
After creating the layer, now you will need to define the panel where you want to add graphics by using the vanishing point tool. First, click on Filter and then click on Vanishing Point. Alternatively, you can press Alt + Ctrl + V to use the vanishing point tool.
Next, look at the top left toolbar and click on the Create Plane option. After that, it will allow you to define the plane where you want to add an image, logo, etc.
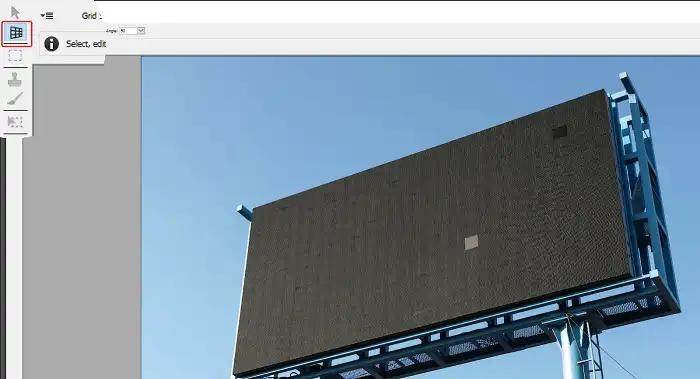
Step 3: Creating Planes On The Subject
After selecting the create plane tool, the cursor will change to a point for creating the plane. Now determine which surface you want to set as a vanishing point workstation where you want to do further editing and pasting other images.
Start placing the cursor on each point of the surface and trace it. For a rectangular surface, you will need four points for selection. Once a surface is selected, you can stretch it to other planes by clicking and dragging the anchor point in a different direction.
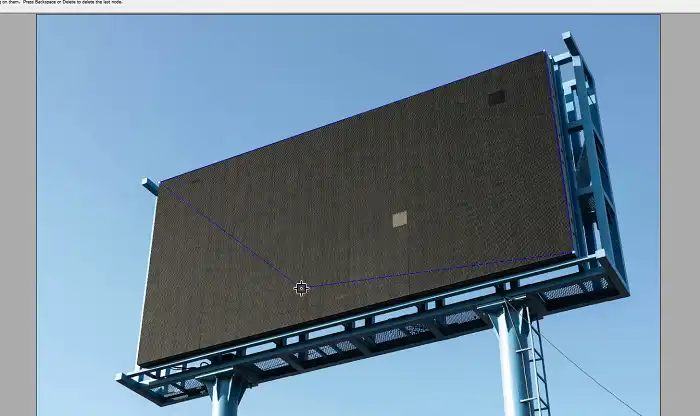

Keep an eye on the color of the generated plane grid. If the color is blue, it is considered a well-selected plane. Other colors, such as yellow/red, would show Photoshop rejects the plane selection.
Step 4: Adding Elements (Text, Images)
Now, go to the other picture’s tab which you want to put into proper perspective. Press Ctrl + A to select the image, copy the image, and then get back to the first image tab where you have used the vanishing point filter.
Next, again go to FIlter > Vanishing Point, and then paste the copied image there. Drag the element onto the desired plane to position it. Photoshop will automatically adjust the element’s perspective to match the plane.

To adjust the size then use the Transform tool (Ctrl + T) to further adjust size, rotation, etc. Hold Shift while transforming to maintain proportions. After adjusting, click on OK.

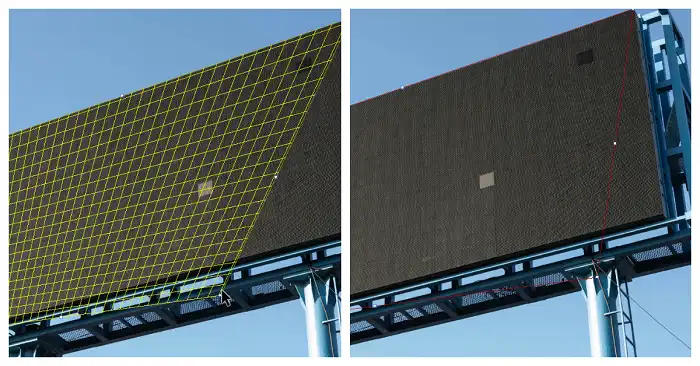
What If the Picture Doesn’t Have Perfect Corners?
When working with the Vanishing Point filter, you might not always have perfect corners to line up your plane. In such cases, you can still utilize this tool effectively. Start by clicking the possible corners that you are confident are correct. You will get something like this –
Once you’ve identified all the corner points, you can refine the perspective by dragging the corners until the plane looks visually accurate. Adjust the positioning of each corner until you’re satisfied with the overall perspective.
After finalizing the perspective, you can zoom in (Ctrl+ ++) to examine the alignment of your points more closely. This step allows you to ensure that all the points are correctly aligned with the desired perspective.
Finally, you have the option to adjust the size of the plane by dragging its edges. This feature gives you further control over the dimensions of the plane, ensuring it fits your desired composition or layout.
Tips For Getting The Most Out Of Your Vanishing Points
Follow these tips for perfecting your perspective overlapping editing skills using Adobe Photoshop.
- It is better to use the vanishing points on graphics with edges such as 3D-shaped boxes, buildings, walls, etc.
- Always create a new layer for defining a perspective on the plane for convenient post-editing purposes.
- Make changes to the grid concentration for control over the plane selection.
- Change the size, angle, and orientation of the images using the Transform tool before posting on the defined perspective.
- Zoom in to the edges and corners for accurately positioning the planes, which the software accepts (Blue grid).
FAQ’s
How do I resize an image in Vanishing Point?
You can resize an image inside the vanishing points by using the Transform Tool. Select the entire graphic and click CTRL+T. Now, use different anchor points on the image and drag them inward or outward to increase or decrease the size of the images. Besides, you manually resize the image by inputting size parameters in different units.
How do you change the angle of a Vanishing Point in Photoshop?
To change the angle in the vanishing point, you must define a plane. After that, select the plane and change the angle value on the “Angle” option on top of the interface. You can manually enter a value or change it using the directional buttons on the keyboard.
Why I Cannot Paste in Vanishing Point?
A direct copy-paste scheme does not work on vanishing points. To successfully paste an image, make a selection of the image by clicking on the specific image layer and pressing CTRL/CMND on the keyboard. Next, copy the image. After that, open the vanishing point dialogue box from the filter menu, and paste the image after properly resizing.
How do I reset my Vanishing Point?
You can reset the vanishing points with a defined perspective by selecting the specific layer and deleting it. Moreover, if you want to reset a specific grid on the perspective drawn, use the selection tool to select the grid and hit backspace to reset it. Another way is to press and hold the ALT button, followed by clicking the reset button to get the job done.
Conclusion
Vanishing point filters come with a lot of advantages in terms of image editing and manipulation. Mastering this tool can result in eye-catching images collaborating with the editor’s creativity.
More on that, working professionally as a graphics person, it is a must to understand how to use vanishing points in Photoshop. It makes working with logo designs and banner designs very easy and convenient.
We hope this article has presented you with the working principle of the vanishing point filter and its advantages. Learning to use vanishing points would enhance your works with 3D graphics and perspectives.