Over the years, digital photography has faced challenges, ranging from bad angles, wrinkles, and double chins. Because of the difficulty of getting rid of double chin flaws, photographers have looked to Photoshop software for answers asking how to remove double chin Photoshop.
The Photoshop software has made innovative editing provisions, aiding in the long-term troubles of portraits. Portrait photographers have found the importance of learning how to remove double chin in Photoshop to satisfy clients with their pictures reducing the stress of getting a perfect shot worth displaying in the house or any other official setting.
Can You Get Rid Of A Double Chin in Photoshop?
Yes, Photoshop can remove a double chin, but it’s pertinent to know what it is and what Photoshop does. Photoshop is used to edit pictures, create images, and graphic designs. The program was developed by Adobe. It uses a layer-based editing system to create and modify images. Layers are also used as masks or filters to change the background color—the layers are enhanced with shadows and other effects. Photoshop actions contain automation options. In other words, Photoshop is software able to distort reality.\
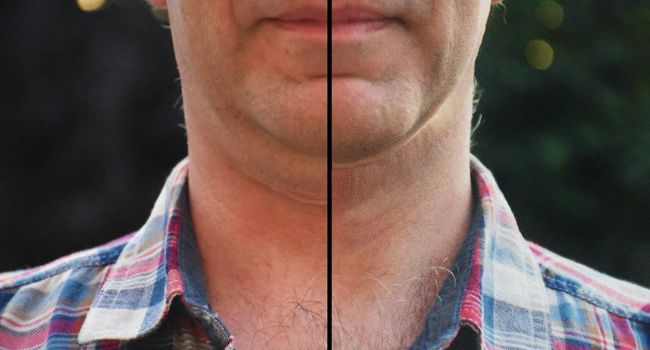
A double chin also referred to as submental fat, is a disorder in which a layer of fat grows behind your chin. You don’t have to be overweight to have a double chin. A double chin can also be caused by genetics or loose skin caused by aging. While obesity is a typical source of excess fat in many areas of the body, including the lower jaw, there are other factors to consider:
Age: Collagen and elastin in the skin become thinner and weaker with age. These proteins maintain the skin’s fullness, firmness, and elasticity. Over time, the body produces less of these proteins, leading the skin, notably the skin under the jaw, to sag.
Posture: The body comprises several muscles, and if these muscles are dormant for a long while, they could lead to bad postures. The muscle under the chin is not left out.
Genetics: Most time, it doesn’t have to do with health issues; It’s just genes. Chances are, the family history contributed to it.
There are several ways to get rid of double chins, but most are not willing to go through the process for several reasons. Hence where Photoshop comes in; with Photoshop software, people can completely get rid of the double chin, having a flawless jawline picture. These pictures are later put up as portraits or for any other official purposes. The Photoshop software promises to offer premium affordable photo touching services to please customers.
How To Remove Double Chin Photoshop?
Photoshop on pictures distorts reality, so it is vital that after editing the picture, it looks real and not fake. That should be the aim of the editor. So while adjusting the pictorial features on the body, do not be carried away; only edit to the extent the human eyes can buy; that is the mastery of the software.

There are several methods which a double chin is removed using Photoshop, and a few are:
The Traditional method: In the first method of how to remove double chin Photoshop, a different image editing application like Microsoft paint is used with Photoshop software. The traditional method involves using a carved-out portion of the image to cover the double chin. The quality of the results varies with the handler, but it is a simple method to remove the double chin. Even though this is a method to cover up the double chin, it is not guaranteed to work for all kinds of angles depicting a double chin. The steps for the traditional method are:
- Firstly, open Microsoft Paint on the computer. It would be easier to search for it in the search box.
- Now click on the “Open existing” image from your drive. Select the picture which is to be edited.
- The picture would appear on the Paint background; drag the white MS paint background to have a wide working space. It gives you a clear visual view of the work.
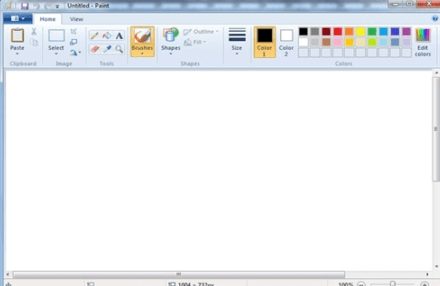
- There is a rectangle up in the selection bar; basically, it crops out the image, which has to be replicated. In this case, a patch of skin close to the chin.
- Click on the rectangle, and place it on the part of the face that is not flawed. Drag until the desired perfect width to cover the double chin is gotten. Zoom the image to get a perfect cut.
- Click on cut and then paste to get the desired patch; this is used to cover the double chin using Photoshop. Delete the remnant of the picture in the MS paint background and save that cut.
- Now open the Photoshop software and select the double chin image that needs editing.
- Mark out a selection around the area where the second image will be placed. The selection tool used will depend on the shape of the area needed to select. A rectangle is used in getting our patch earlier on. Use Photoshop’s Polygonal Lasso Tool, it is hidden behind the standard Lasso Tool in the Tools palette.
- Hold the mouse button down for a few seconds until the menu appears, and then select the Polygonal Lasso Tool from the list.
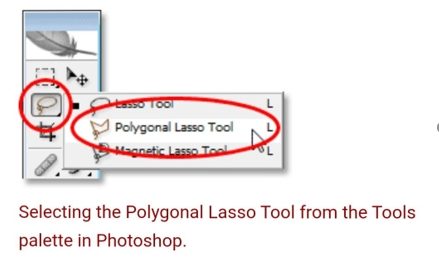
The Polygonal Lasso Tool is like a pen used to carve out a selection by clicking at different points where the selection’s orientation needs to change. When one clicks on a new point, Photoshop draws a straight line between it, and the previous point clicked on, similar to how the Pen Tool draws straight path segments. Keep clicking around the region that has to be selected until the full area has been highlighted and the cursor has returned to the beginning. Photoshop will construct the selection when the first point is clicked on again.
Selecting the chin is not hard; highlight the second chin’s section from end to end.
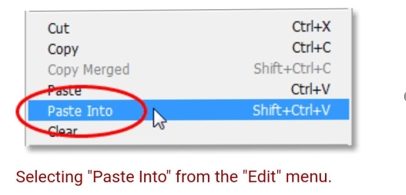
- Open the second image and use the shortcut Ctrl+A (Win) / Command+A (Mac) to fix a selection around the entire image. It would be something like this

- Switching back into the original image, paste the second image into the selection. Go to Edit and select “paste into”
In the Layers palette, Photoshop creates a new layer above the Background layer by placing the second image on it, the selection made is then used to create a layer mask, which hides all areas of the second image falling outside of the selection, leaving only the area inside the selection visible. The only part of the skin showing will be the area that fits inside the chin option.
- Use the free transform option or the perspective transform mode to adjust the second image if needed. To fix that, press Ctrl+T (Win) / Command+T (Mac)
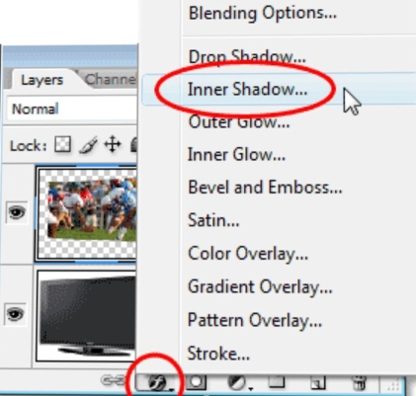
- The beautiful final step is adding the inner shadow. Add just enough to cover the patch so that it is not too obvious. The result would come out well.
This method is quite tedious, but it is easier than the others and worth trying.
Photo retouching method: This method is a more professional one. It involves using certain features of Photoshop software to get rid of the double chin. It needs a little more experience compared to the traditional method, and its results are more realistic when compared.
- Before starting, it is important to create duplicates of the background so that the original image is not affected.
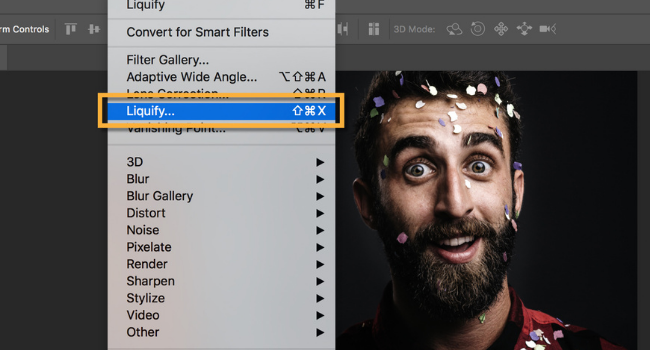
- To get rid of a double chin, use the Photoshop tool Liquify. Use the key Shift + Ctrl + X to navigate to Filter > Liquify- this is a shortcut.
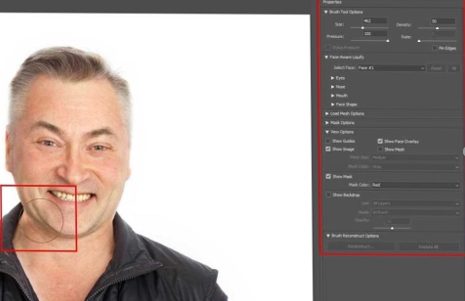
- Select the Forward Warp Tool, the most effective tool for altering facial characteristics and removing double chins in Photoshop. The shortcut key “W” can also be used.
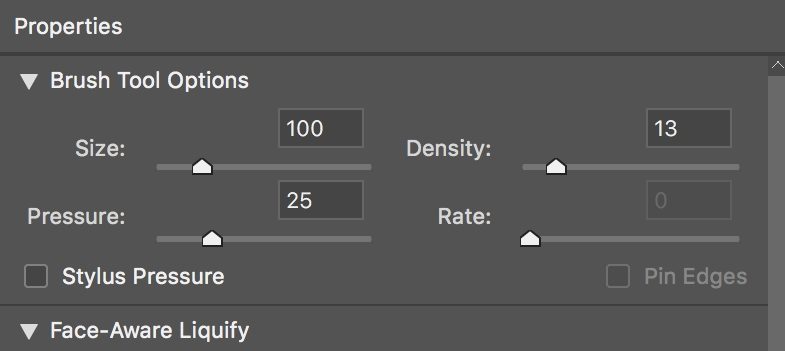
- On the right panel, select the properties. It is possible to modify the brush’s size, density, pressure, and rate here. In the image below, look at the characteristics that are being used.
- Click and drag to get started with the tool. Play around with it to see how it works. Be careful not to overuse the Forward Warp Tool’s effect, as it’s easy to get caught up and deform the face.
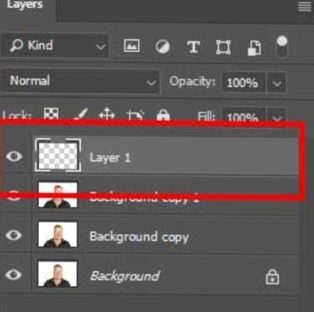
- After that, use the Liquify tool to produce a new empty layer; go to Layer–New–Layer. The shortcut for PC is to press Shift + Ctrl + N, and for Mac, press Shift+Command+N.
- On the right panel, click the History Brush Tool icon, or hit the “Y” shortcut key.
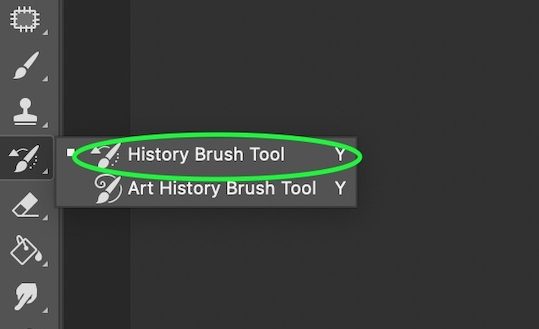
After using the Liquify Tool, start painting over the sections that need to be restored. For example, shadows and moles on the neck and under the chin migrated when utilizing the plastic filter.
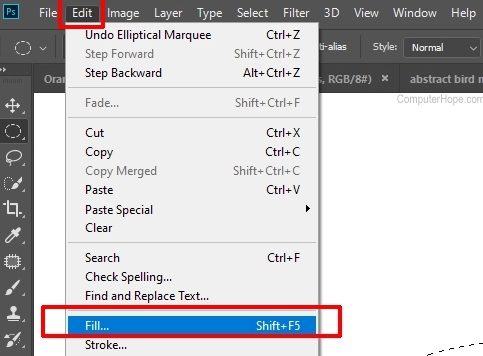
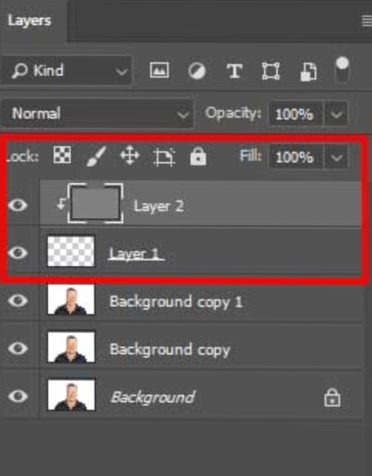
- Now, another empty layer has to be created and filled
- Click on Edit then Fill; for the shortcut, press Shift+F5.
- Fill the area with 50 percent gray and 100 percent opacity.
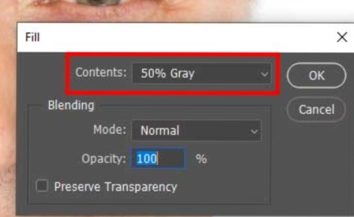
- The thumbnail’s Layer will appear gray
- The next step is adding noise to the photo. To do this, go to filters, select noise, and then add noise. The Add Noise filter adds random pixels to an image, replicating the effect of photographing with a high-speed camera. The filter also decreases banding in feathered selections or graduated fills to give severely retouched sections a more realistic look or create a textured layer.
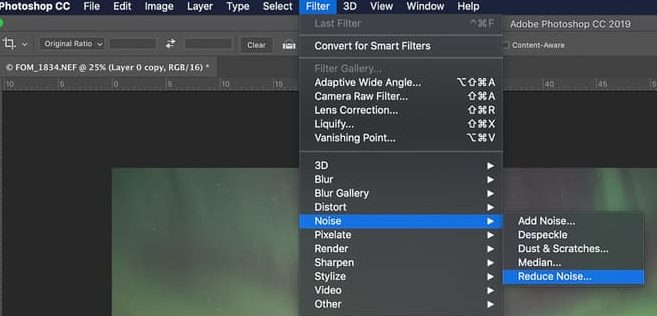
- Set the parameters once the “Noise” dialogue appears. Use 1% grain; however, the quantity needed will depend on the image.
- Then, blur the noise. To do this, go to filter, select Blur, and then Gaussian Blur.
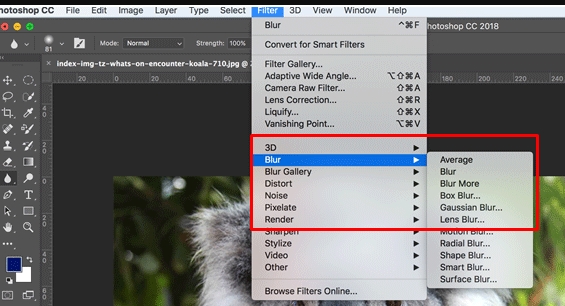
- The Blur’s radius is changed if needed. The value chosen here is 0,3 pixels. Remember that the larger the radius, the more blurry the image.
- To duplicate the texture, change the blend mode to Linear Light.
- All that’s left now is to make a clipping mask. Choose the texture layer on top and go to Layer> Create Clipping Mask.
Creating a better-looking image needs shadows.
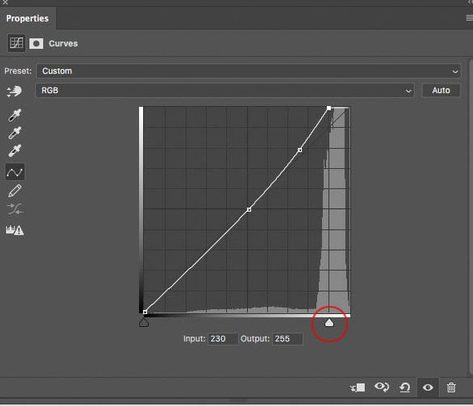
- Create the curves adjustment layer first. Use the shortcut button at the bottom of the Layers panel to go to Layers > New Adjustment Layer > Curves or to Layers > New Adjustment Layer > Curves.
- Make a control point and drag it down, as shown in the illustration. The image will darken in certain tones as a result of this.
- To this Layer, apply a layer mask. It will be filled with white by default, so you’ll need to reverse it. Go to image> Adjustments > Invert to do so. Press Cmd+I (Mac) or Ctrl+I (PC) for faster access. If you look at the preview thumbnail now, it’s all black.
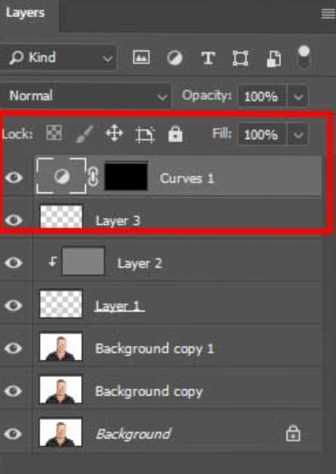
- Begin by drawing shadows on the chin and neck. In the preview thumbnail, the covered region will appear white. If an area of the photo is accidentally painted on, press X to change the foreground color to black, then paint over the area to correct the error.
The aim of darkening the parts of the chin gives the image a more natural look.
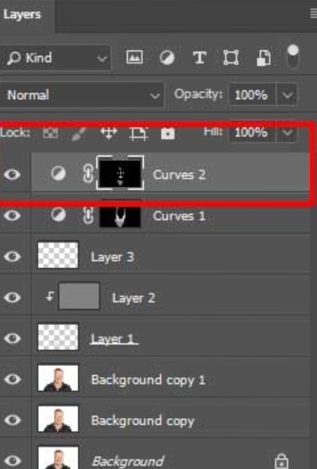
- We’re nearly finished eradicating a double chin! All that remains is to repeat the previous two stages for the light regions. That means you’ll have to recreate the curves adjustment layer, but this time move the control point higher, as shown in the image below.
- This adjustment layer should also have a layer mask. Cmd+I (Mac) or Ctrl+I (Windows) will invert it (for PC)
- Start brightening up some of the spots and that’s it. The regions painted are seen in the adjustment layer preview. Again, don’t stress making everything perfect; there is always room to undo an error.
The key to obtaining a perfect image is endurance. While editing, it is important not to rush. The Photoshop software works by using light to create illusions in the eyes, making them a reality.
Conclusion
How to remove a double chin Photoshop solely depends on the angle of the picture taken. As a digital photographer, it is important to take angles more appealing to the client.