Getting decent light or natural color in headshots is not as easy as it seems, especially for beginner photographers. Things may seem more complicated if you’re taking the portraits yourself!
This is where Adobe Lightroom comes in handy. Unlike Photoshop, this software is specifically designed for beginners to edit and enhance photos without breaking a sweat.
Now, if you don’t know how to edit headshots in Lightroom yet, this article will definitely help. As we walk through some common headshot editing challenges, I’ll show you how to resolve them using different Lightroom tools. And with just a little practice, you can give your headshots the look they deserve.
Do you need a professional headshop retouching service? Clippingfly would be the best option for you. Check out our service page for more info on headshop retouching.
Can I Edit Headshots Like Other Photos?
Yes, headshots can be edited, just like any photos. In fact, almost every photo you see in magazines or online has been edited to some extent.
Photo manipulation is now considered an integrated part of photography, and for good reasons. Whether it’s a small tweak to the color balance or a major retouching of the subject’s skin, tools like Photoshop or Lightroom can always come in handy.
However, editing headshots is a bit different than editing other types of photos.
Since headshots are usually taken at close range, any blemishes or imperfections on the subject’s face are often magnified. This means that you’ll need to be extra careful when editing headshots, as even small changes can have a big impact.
And while some people may think editing is unethical, it’s actually a great way to improve your photos and get the best out of them. After all, even the best photographers often use and promote editing software for perfection. So why shouldn’t you!
How To Edit Headshots In Lightroom?
Now, let’s walk you through my step-by-step guide to editing headshots in Lightroom. The first thing you’ll need to do is open your headshot in Lightroom. To do this, go to the File menu and select “Open with Lightroom” Then, proceed with the following steps.
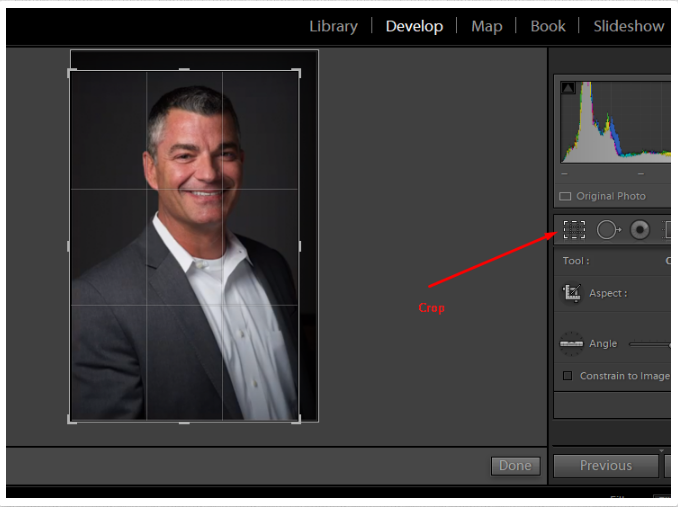
Step 1: Crop and Straighten Your Images
The first step in editing your headshots is to crop and straighten them. This is important because it ensures that your photo is properly composed and the face gets the most focus.
- Now, go to the Develop module and select the Crop tool to crop your image.
- Next, use the grid lines to crop out any unnecessary photo parts. For example, if there’s too much space above the subject’s head, you should crop it out.
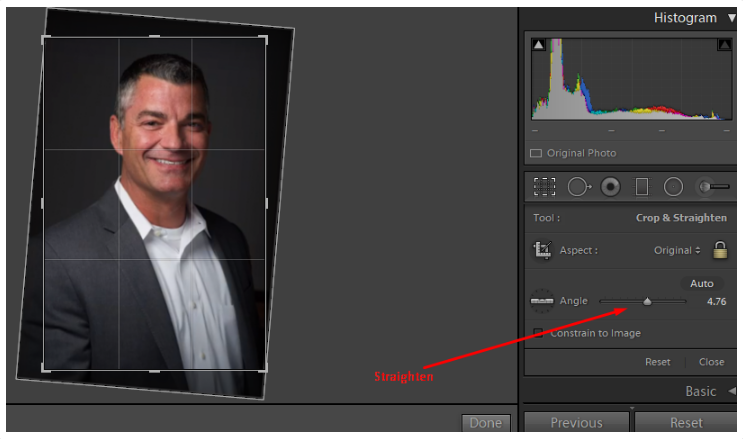
- Once you’re happy with the crop, you can straighten the photo by selecting the ‘Angle’ option.
- Then, click and drag the grid lines until they’re perfectly horizontal or vertical. You can also use “auto” or “rule of thirds” guides to help you straighten out your photo.
Step 2: Fix Any Lens Distortion
For professional results, you must fix any lens distortion in the picture. To do this-
- First, go to the Develop module and click on Lens Corrections.
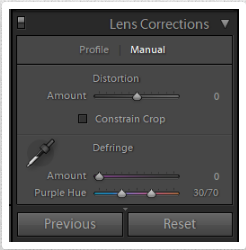
- Next, click Manual at the top of the panel. Then you’ll see a grid with a slider in it—this will help you manually correct any lens issues in your photo. The slider works by moving each grid corner until it aligns with what’s in your image.
If a line appears skewed or crooked when looking through your camera lens, then it means that a particular edge needs some adjustment (horizontal or vertical).
You can also hover over each corner and get an idea of how to adjust it by seeing which side has more correction needed than another—usually, one side will be completely off from where it should be.
Once all four corners are lined up correctly with how they look through your camera lens, hit done.
Step 3: Adjust the White Balance
Let’s now move on to adjusting the exposure. This is important because it ensures that the colors in your photo look natural. If the white balance is off, the colors will look either too “warm” or too “cool“.
To adjust the white balance-
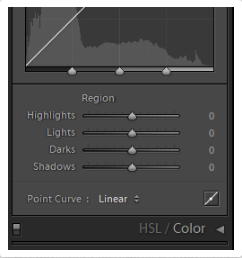
- Go to the Develop module and find the “Tone Curve” section. Here, you can use the “Lights” and “Darks” sliders to adjust the white balance.
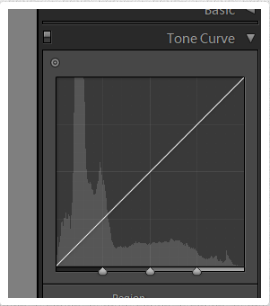
- You can also select a preset from the drop-down menu, such as “Daylight” or “Cloudy“.
If you’re not sure how to adjust the white balance, a good rule of thumb is to make the photo look slightly warmer. This will help to make the subject’s skin look more natural.
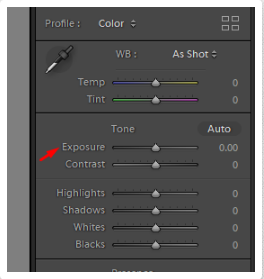
Step 4: Adjust the Exposure
Let’s now move on to adjusting the exposure. Having the right exposure is vital for ensuring that the portrait is not overexposed or underexposed.
- Go to the Develop module and find the “Exposure” section to adjust the exposure. Here, you can use the “Exposure” slider to make the photo brighter or darker.
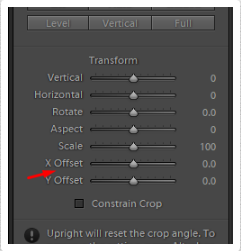
- You can also use the “Offset” slider from the ‘Transform’ option to fine-tune the exposure. Making the photo too dark or too light isn’t a great idea.
Step 5: Adjust the Contrast
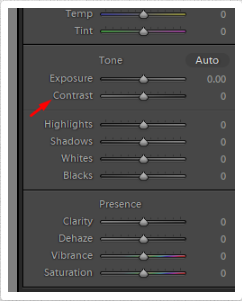
Find the “Contrast” section in the Develop module and use the “Contrast” slider to increase or decrease the contrast.
The perfect contrast can make the photo look more dynamic. Nevertheless, you don’t want change too much, as this can make the photo look artificial. Keeping the numbers low will help to keep the photo looking natural.
With the Adjustment Brush, you can make targeted adjustments to specific areas.
To add more contrast and make your subject pop, place the cursor outside the brush thumbnail and click-and-drag in an area where you want to add contrast.
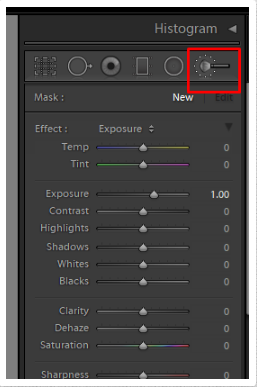
You can also use this tool to increase the contrast in other parts of the photo. I recommend starting with the eyes because eyes are often what draws viewers into a headshot.
When working on those areas, keep in mind that looking at photos with similar lighting conditions helps to know how much contrast works well for different subjects. For example, someone with darker skin tones might need less contrast than someone with lighter skin.
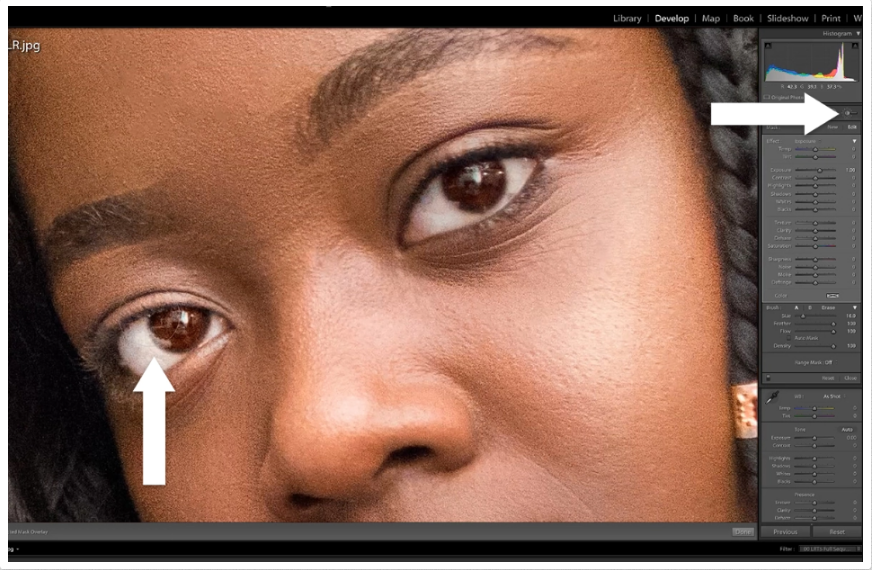
Step 6: Selectively Sharpen the Eyes Using a Brush Tool
After fixing the contrast, the eyes stand out more when sharpened. And here’s how to do it.
- To begin, select the subject’s eyes.
- Now move on to using the brush tool. Click on the brush icon in your toolbar and select a soft brush from the drop-down menu. I like using a size of 20 pixels with an intensity of 50%, but feel free to experiment with what looks best for your image.
- Next, paint over each eye individually with your desired settings (high opacity and low flow).
The only thing left is to add some additional light to the eyes by adjusting the angle at which they reflect light.
Click on “Angle” in Lightroom’s Develop Module and adjust it until you have achieved your desired result. Hhigher number means more reflection towards that direction (for example, bouncing off onto cheekbones), while a lower number means less reflection (for example, not bouncing off onto cheekbones).
Step 7: Reduce Noise (If Needed)
Once you’re done with the eyes, it’s time to reduce noise if necessary. Noise basically refers to the image distortion or a slight grainy veil on parts of the picture.
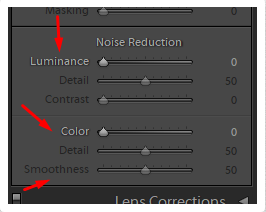
If you notice this issue, the first thing to do is select the “Detail” tab in Lightroom and click on the “Noise Reduction” slider. You’ll see that there are three options:
- Remove Luminance Grain
- Reduce Color Noise
- Smooth Detail and Texture
For the best results, you should use all three of these options. Start with the “Remove Luminance Grain” slider and move it to the right until you’re happy with the result. Then, do the same with the “Reduce Color Noise” and “Smooth Detail and Texture” sliders.
You can also use the “Noise Reduction” brush tool to selectively reduce noise in specific areas. To do this, simply click on the brush icon and select a soft brush. Then, paint over the areas where you want to reduce noise.
Step 8: Fix Skin Imperfections
Fixing skin imperfections is a matter of trial and error. You will likely have to use multiple methods to get the result you want.
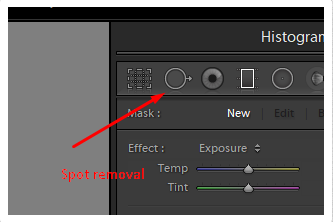
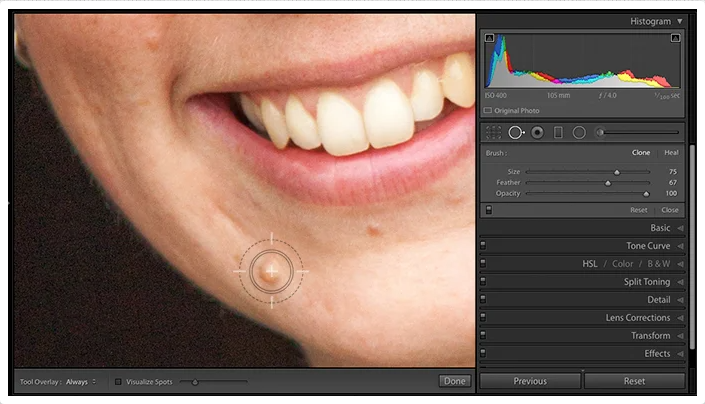
For example, if your subject has acne scars or redness around their nose and cheeks, you’ll need to use the spot removal tool.
This tool removes them by clicking on each flaw and using an appropriate brush size. The editing may require some repeated clicks as Lightroom won’t always select the entire area you want fixed with just one click.
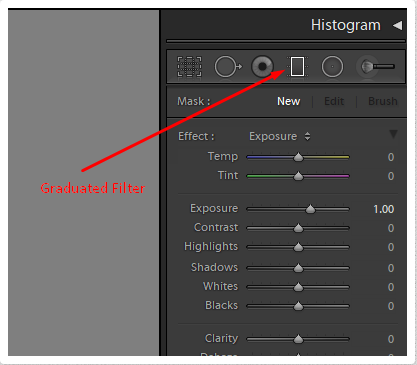
If larger areas need fixings, like freckles or skin discoloration, use the graduated filter tool instead.
It’ll help you ensure that all areas are affected equally, and there aren’t any darker spots left behind when adjusting for lightness/darkness (this happens with spot removal).
Step 9: Fix Blemishes
Use this same technique when correcting blemishes under the eyes as well—if you spot heal too much near those areas, it will leave dark circles behind.
The adjustment brush works well here too but requires more finesse since it’s not automatic like graduated filters are. Make sure no color gets painted outside of where it needs to go.
Finally, if there are still spots on your subject’s face, try using radial filters instead of other kinds. They let you paint in whatever tone without affecting surrounding pixels too much.
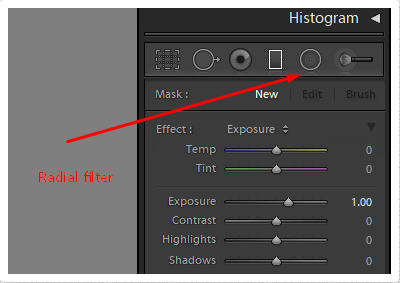
Besides, they’re great at evening out skin tones across large areas like cheekbones, without having any noticeable borders between colors like other tools would show up due to their feathered edges.
Step 10: Add a Vignette (Optional)
Adding a vignette is a matter of personal preference. I like to use them sparingly, but some prefer a more noticeable vignette.
To add one, click on the “Effects” tab in Lightroom and move the Vignetting slider to the right until you’re happy with the result.
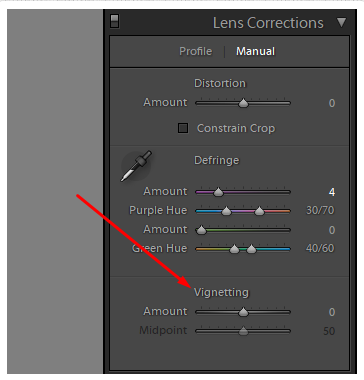
You can also experiment with the “Highlights” and “Shadow” sliders to create a more customized vignette.
How To Retouch Skin Tone And Shadows With Adjustment Brushes And Filters On Lightroom?
Now that you’ve made some basic adjustments, it’s time to correct skin tones, lighten the shadows, and bring out the best in your subject’s face. These skills are quite essential for any professional headshot retouching service.
Lightroom has several tools at your disposal for this, like adjustment brushes, radial filters (both graduated and spot), color range for targeted corrections, and various local adjustment tools. Each works uniquely to help you achieve specific results on a small section of an image rather than all over it.
Let’s take a look at the three most popular ones.
Adjustment Brushes
There are two types of adjustment brushes in Lightroom: the graduated filter and the regular brush. The former is better for large, even areas like skies or cheeks; the latter is better for small, precise areas like eyes or mouths.
To use either, select the icon from the toolbar and then paint over the area you want to adjust.

For this example, we’re going to use the regular brush. Select the “Brush” tool from the toolbar and choose a soft-edged brush. Adjust the size and hardness of the brush to fit the area you’re working on. In our case, we will lighten the shadows around our subject’s eyes.
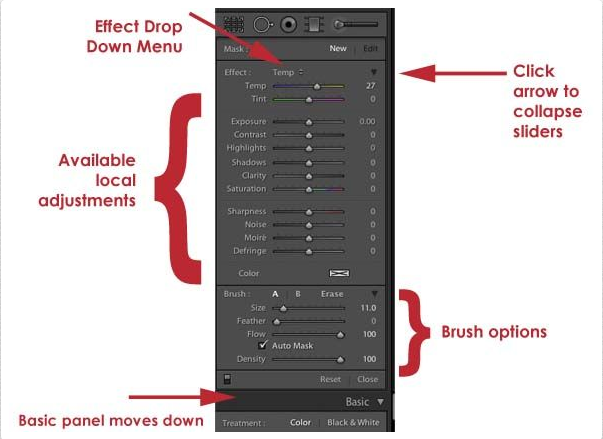
Start by painting the entire shadowed area and then release the mouse button. This will bring up a dialogue box with all of the available settings. I generally increase the Exposure and decrease the Shadows for most portraits, but this may vary depending on the picture.
You can also use the other options in this dialogue box to make more targeted adjustments. For example, if you want to lighten just the blue in the shadows (to make your subject’s eyes appear more vibrant), increase the “Clarity” slider and decrease the “Saturation” slider.
Click “OK” when you’re finished, and then repeat this process for any other areas that need adjusting.
Radial Filter
It’s an incredibly useful tool that can apply color corrections, effects, and more to specific areas of your image.
For retouching with radial filters, select the “Elliptical” or “Circular” icon from the toolbar and then click and drag to create a shape over the area you want to adjust. You can choose from one of the presets in the drop-down menu.
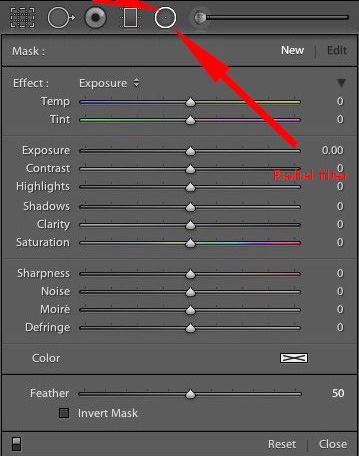
If you don’t like any of them, click on the “New” button at the bottom of the drop-down menu and then choose from one of Lightroom’s other presets or create your own.
Just like with adjustment brushes, you can use the various sliders in the dialogue box that appears to make targeted adjustments.
Once you have completed the adjustment, click “OK” and repeat it for additional adjustments.
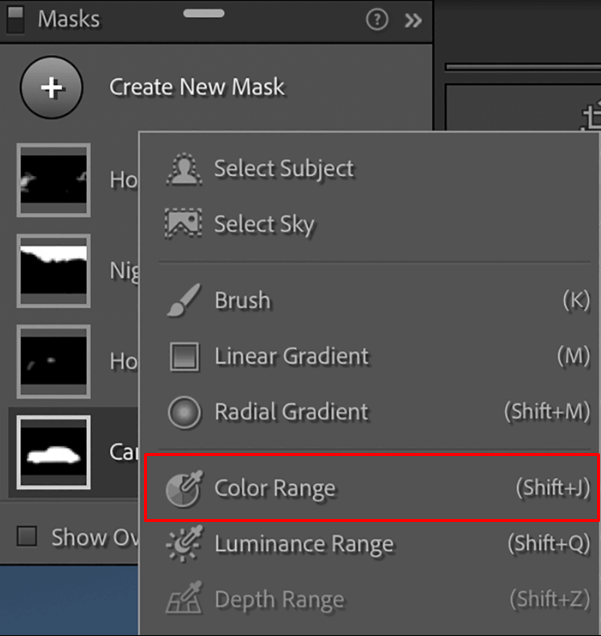
Color Range
The color range tool is a great way to make targeted adjustments to specific colors in an image. To use it, select the “Color Range” icon from the toolbar and then click and drag to create a shape over the area you want to adjust.
For example, if you’re going to lighten the shadows around your subject’s cheekbones, you want to create a shape that covers just the area where the shadows are.
You can use the various sliders to target specific colors in the dialogue box that appears. For this example, we will increase Clarity and decrease Saturation just like we did with the adjustment brushes.
What Are The Best Alternative Tools To Edit Headshots?
If you’re not a fan of Adobe Lightroom, there are plenty of other great options out there. Some of my personal favorites include:
- Capture One
A great alternative to Lightroom with a wide range of features and an intuitive interface.
- ON1 Photo RAW
Another excellent Lightroom alternative that’s perfect for those who want more control over their editing.
- Skylum Luminar
A newer option that’s quickly gaining popularity for its AI-powered editing tools.
- Adobe Photoshop
Maybe I don’t need to say a word about this—Photoshop is undoubtedly the industry-standard photo editing software that offers endless possibilities for creative edits.
- GIMP
A free and open-source alternative to Photoshop with a wide range of features. It’s your best bet if you’re more used to working on Linux distros.
Bottom Line
Hopefully, you’ve learned some useful tips for post-processing your headshots, whether you want to make your subject look younger, more energetic, or simply pop with vigor.
These photo correction techniques can be a simple way to improve your subject’s appearance. While the purpose of this guide was to show how to edit headshots in Lightroom, it may come in handy for any photo.
And a simple photo edit can go a long way. From here onward, it’s up to you as the photographer and editor to use your own personal touch to pass each client’s camera test. Click the following for headshot retouching services. Good luck!